Showing posts with label Vegetables. Show all posts

Thursday, August 27, 2015

Stuffed Tomatoes French Style - "Tomates Farcies" and Provençale


Tomates Farcies are very popular in Provence, especially in the spring and summer. Farcies or farci in French means stuffed, most often with finely ground meat. Provence doesn’t just stuff tomatoes. They also stuff all sorts of small vegetables, such as round baby zucchini and petite squashes, small eggplants, and sweet peppers and that dish is called petit farcies. Petit farcies are a Provencal real summer treat and the method is for stuffing them is almost exactly the same as for the tomatoes.

The flesh of the vegetables, in our case tomatoes or tomates as they are called in France, are scooped out and the pulp is minced and put into a bowl with three different kinds of chopped ground meat, finely chopped eggplant, a variety of fresh herbs, a little minced garlic, and a bit of beaten egg, olive oil, milk and flour to hold the mixture together, then the stuffed tomatoes are baked in a hot oven until heated through. They are a perfect warm weather lunch or supper to pair with a crisp green salad and a cool glass of wine.  


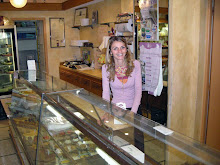
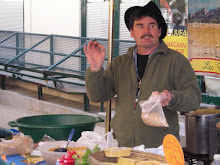
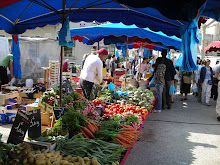
We had the pleasure of shopping frequently at a small grocery store where we stayed in Maillane that Chef Christopher, a 6th generation butcher, and his wife Claudette owned. Here’s a photo of Christopher clowning around with Meakin one day. Christopher and Claudette are a delightful couple who opened their hearts to us and became a very special part of our time in Provence this year. I’ll save more about them for a later post, but I wanted to share Christopher’s tomates farcies recipe with you before the summer tomatoes disappear. We brought his tomates farcies home from their store for lunch as well as dinner numerous times during our visit.

In Provence there are probably as many recipes for stuffed tomatoes as there are cooks. However I think one of the secrets to the success of Christopher’s tomates farcies, in addition to his delicious stuffing, is that he lets the scooped out tomatoes sit upside down all night so they rid themselves of excess water. I also like the fact that he preserves the tomato tops for presentation. His were much prettier than mine and their tops had a bit of green ends, so I’ve substituted a couple of basil leaves to give them that touch of green. I’ve paired the tomates farcies with an arugula salad with grated Parmesan “snow,” recipe follows.


Tomates Farcies
As told to us by Christopher, a 6th generation French butcher from Provence, serves 4, easily doubled or tripled
Printable Recipe

4 ripe, but firm red tomatoes
Flesh from the insides of the tomatoes, seeds and juices discarded
Good sea salt, preferably French
1 ½ cups of a combination of ground veal, beef and pork, cooked and finely chopped
Peeled and chopped eggplant, about 1 ½ cups
½ cup cooked and chopped button mushrooms, optional
1 small clove of peeled garlic, finely chopped
1 tablespoon finely chopped fresh thyme leaves
1 tablespoon finely chopped fresh rosemary
3 tablespoons finely chopped fresh flat-leaf parsley
Milk to add moisture
1 large egg, beaten to blend
1 tablespoon all-purpose flour
Olive oil for drizzling

Slice off the top of each tomato and set the tops aside for later. If necessary, cut a thin slice from the bottom so the tomato will stand upright. Scoop out most of the flesh of the tomatoes, remove the seeds discard extra juice and set aside to use in the filling. Salt the insides of the tomatoes with good sea salt and set on a rack, upside down to drain overnight in the refrigerator.

The next day remove the tomatoes from the refrigerator and preheat the oven to 350 degrees F.

Place the bread in a bowl with a little splash of milk and let it soak for a few minutes. Meanwhile, in a hot skillet, brown the meat in a little olive oil, breaking the meat up with a wooden spoon as it browns. When the meat is almost done, season with sea salt and freshly ground black pepper and cook until done, then set aside in a large bowl. Add the chopped eggplant, chopped mushrooms (optional) and finely chopped garlic to the meat mixture, then remove to a food processor fitted with a steel blade and process until coarsely ground. Return to the bowl and season with chopped fresh thyme, chopped parsley and a beaten egg. Stir well to combine and add a splash of milk and a tablespoon of all-purpose flour to bind the mixture, and then with a spoon carefully stuff the tomatoes with the meat and vegetable mixture. Place the stuffed tomatoes in an ovenproof pan (it’s okay that they touch), replace the reserved tomato tops and bake for 30 to 35 minutes until the filling is heated through (registers 160 degrees F on an instant read thermometer) and the tomatoes have softened. Carefully remove the tomatoes from the pan and serve either hot or warm.

Cook’s note: Christopher used equal parts veal, beef and pork, but some lamb, which is very popular in Provence, would be wonderful either added to or substituted for one of the other meats in the mixture.  


Arugula Salad with Parmesan “Snow”
From My Carolina Kitchen, serves 4, easily doubled
Printable Recipe

4 cups fresh arugula
Good Parmesan cheese

Vinaigrette:
1 tablespoon vinegar of your choice, balsamic, red wine
Maldon sea salt
3 tablespoons extra-virgin olive oil
1 teaspoon Dijon mustard
Freshly ground black pepper

Place a wedge of Parmesan cheese briefly in the freezer for about 20 minutes. In the meantime make the vinaigrette by placing the vinegar, oil, salt and Dijon mustard in a jar with a tight fitting lid, then shake well to mix. Add arugula to a large salad bowl and toss with the vinaigrette. Season with some freshly ground black pepper. Divide the tossed arugula among 4 plates and, using a rasp grater, grate the Parmesan “snow” directly on top of the each individual salad and serve right away.


Today I also have another tomates farcie, which is an old Hoffer family favorite – Tomates Provençal that is paired with chicken breasts with pancetta cream and peas, post and printable recipe link here. Tomates Provençal uses seasoned bread crumbs as a stuffing rather than a meat and vegetable mixture. These tomatoes appear as a side dish on our table almost year-around. Did I hear you say you serve tomatoes in the winter? Well, yes. I find that when you bake tomatoes, the process of baking softens the tomatoes and lets their own flavors shine. If it’s winter when tomatoes aren’t their best, I’ll sprinkle just a tad of sugar in their centers before salting and stuffing them. That little touch of sugar brings out the tomatoes own natural sugars and makes a big difference. But be careful, you don’t want to be able to taste the sugar, so use a light hand.


Tomates Provençale
An old Hoffer family favorite, serves 4, easily doubled or tripled
Printable Recipe

Preheat the oven to 400 degrees F. Cut the stem end off of each tomato and remove about a third to half of the core and discard. If necessary, cut a thin slice from the bottom so the tomato will stand upright. Sprinkle the insides of the tomatoes liberally with good sea salt and turn the tomato over and let drain on a rack or paper towels. In a bowl mix together equal parts seasoned dried bread crumbs and Panko bread crumbs with your choice of chopped fresh herbs (I like flat-leaf parsley, thyme and rosemary, or if fresh basil is in season, use in place of the rosemary). Drizzle a little good extra-virgin olive oil in the crumb mixture and mix until it comes together, then stuff the crumb mixture into the tomatoes, mounding on top with a spoon.

Place the tomatoes, crumb side up, in an ovenproof pan and drizzle a little more extra-virgin olive oil over the tops, letting some fall into the pan. It’s fine if the tomatoes touch. It helps them hold themselves upright. Roast for 20 to 25 minutes until the tops are golden and the tomatoes have started to soften. Check the tomatoes at 15 minutes to make sure the crumbs aren’t burning. Serve hot, warm, or at room temperature as a side dish.

Variations: Add a small piece of raw bacon on top of the crumbs before placing in the oven. Include some finely chopped garlic in the crumb stuffing. Vary the fresh herbs according to your taste.

For better viewing, click photos to enlarge.

This will be shared with Foodie Friday at Rattlebridge Farm and Miz Helen’s Country Kitchen Full Plate Thursday.
Have a great weekend everyone.

Wednesday, February 11, 2015

Chicken Cutlets with Raspberries, Lemon Rice & Green Beans Gremolata + Valentines Day Dessert Ideas


Chicken cutlets with raspberry make a perfect entrée for an intimate evening, such as Valentines’ Day. I’ve paired it with lemon rice and Ina’s green beans gremolata for an easy-to-put-together dinner. If you also have in mind a fancy dessert but want to be able to prepare it in advance, I have three suggestions for you, starting with a decadent chocolate raspberry tart if you want to continue the raspberry theme, recipe here.  


Still on the thoughts of chocolate, the classic French chocolate mousse is always a winner, recipe here.


And of course you can never go wrong with Crème Brûlée, recipe here.


The chicken cutlets with raspberries recipe comes together very quickly by using thin cutlets, available in the poultry section of your market, saving you the time of pounding regular chicken breasts. Frozen raspberries work perfectly fine (no one will guess they are frozen, promise) for the sauce of red raspberries, but it’s nice to add a few fresh ones to garnish the finished dish. I always think rice is a nice addition to a dinner that contains a sauce. Lemon rice is an excellent dish when you need a delicate, fresh flavor with an important main course. And of course Ina’s green beans gremolata are so versatile and pair well with almost any chicken dish.


Chicken Cutlets with Raspberries
Slightly adapted from The Silver Palate Good Times Cookbook by Sheila Lukins and Julie Rosso, serves 6
Printable Recipe

12 thin skinless, boneless chicken cutlets or 6 whole chicken breasts (12 halves), skinless, boneless, and pounded thin (1/4 inch)
Kosher salt and freshly ground black pepper
4 tablespoons unsalted butter
3 tablespoons raspberry vinegar
½ cup dry white wine
1 ½ cups fresh or frozen raspberries, thawed if frozen
1 knob of cold, unsalted butter
Finely chopped fresh flat-leaf parsley for garnish
A few fresh raspberries for each serving as a garnish

Sprinkle both sides of chicken pieces with salt and freshly ground black pepper. Melt the butter in a large sauté pan over medium heat and sauté the chicken, a few pieces at a time, in the butter just until browned on each side. Remove to a warm serving platter.

Pour the vinegar and wine into the pan to deglaze it. Stir in the raspberries and cook over high heat, stirring constantly, until reduced by half. Remove from the heat and a knob of cold, unsalted butter and stir to incorporate into the sauce. Pour the sauce over the chicken breasts and serve immediately. Garnish with chopped fresh flat-leaf parsley and a few fresh raspberries for each serving. Serve with lemon rice.


My Mother’s Rice – method works every time
From My Carolina Kitchen by Sam Hoffer
Printable Recipe

My mother had a very easy but unusual way to cook rice and I’ll share her method with you. It always turned out perfectly, no lumps or sticky clumps, and no fancy cookers. She cooked the rice in lots of boiling salted water, the same way you cook pasta. Twenty minutes for white rice, 35 minutes for brown. After draining it well, she put the rice back in the pan, stirred in a pat of butter, and left it covered on the stove for up to twenty minutes before serving. Her preferred brand of rice was Uncle Ben’s converted rice and I’ve never used anything else, so I’m not sure how it would work with other brands. But I will add that this recipe has never let me down. Recently Cooking Light magazine recommended the same method.

Lemon rice: 
Inspired by The Silver Palate Good Times Cookbook by Sheila Lukins and Julie Rosso, serves 4 to 6

Proportionally for every cup of uncooked rice from recipe above, stir in 1 tablespoon finely grated lemon zest to cooked rice after is has been drained. Let the rice and lemon zest mixture stand together, covered, for 5 minutes in the pan. Add some finely chopped fresh herb of your choice (flat-leaf parsley or dill) along with a pat of butter, check for seasonings and serve immediately.


Green Beans Gremolata
Slightly Adapted from Foolproof, by Ina Garten, serves 4 to 6
Printable Recipe

1 pound French green beans, trimmed
Kosher salt
2 teaspoons minced garlic (2 cloves)
1 tablespoon grated lemon zest (2 lemons)
3 tablespoons minced fresh flat-leaf parsley
3 tablespoons freshly grated Parmesan cheese
2 tablespoons toasted pine nuts (I used a mixture of toasted almonds, walnuts, and pistachios)
2½ tablespoons good extra virgin olive oil
Kosher salt and freshly ground black pepper

Bring a large pot of salted water to a boil. Add the green beans and blanch them for 2 to 3 minutes, until tender but still crisp. Drain the beans in a colander and immediately put them into a bowl of ice water to stop the cooking and preserve their bright green color.

For the gremolata, toss the garlic, lemon zest, parsley, Parmesan, and nuts in a small bowl and set aside.

When ready to serve, heat the olive oil in a large sauté pan over medium-high heat. Drain the beans and pat them dry. Add the beans to the pan and sauté, turning frequently, for 2 minutes, until coated with olive oil and heated through. Off the heat, add the gremolata and toss well. Sprinkle with 3/4 teaspoon salt and 1/4 teaspoon pepper and serve hot.

For better viewing, click photos to enlarge.

This will be shared with Foodie Friday at Rattlebridge Farm, Miz Helen’s Country Kitchen Full Plate Thursday , & Food on Friday at Carole's Chatter.
Happy Valentine’s Day everyone.  

Tuesday, April 15, 2014

A Medley of Asparagus Recipes


Asparagus is our favorite side dish to serve for Easter. It holds up well at room temperature on a buffet and almost everyone loves it. Each year I make it my mission to find a new asparagus recipe to add to our ever growing list of favorites. This year I’ve done a new version of my favorite asparagus mimosa recipe – I’ve sprinkled the chopped egg topping with briny capers.

I’ve included my basic recipe for poached asparagus as well as my basic French vinaigrette. With building blocks such as these, you can do a lot of different versions of garnishes, such as capers & chopped eggs or anything else that strikes your fancy.

Asparagus Mimosa, also known as Asparagus Goldenrod with Capers
From My Carolina Kitchen – Sam Hoffer

Prepare My Carolina Kitchen’s Basic Recipe for poached asparagus below. Dress with My Carolina Kitchen’s Basic French Vinaigrette below, using freshly squeezed lemon juice. Garnish with a chopped hard-boiled egg and some drained capers.

My Carolina Kitchen’s Basic Recipe for Poached Asparagus
From My Carolina Kitchen – Sam Hoffer

1 lb fresh asparagus, tough lower ends snapped off
2 teaspoons salt
Water flavored with low sodium, low fat beef broth* to taste

After tough ends of asparagus have been removed, peel the remaining ends unless the asparagus is thin; if thin, leave as is. Bring water flavored with beef broth and 2 teaspoons salt to a boil in a shallow pan. Add asparagus, turn heat to low and cook for about 4 minutes until asparagus is crisp tender, taking care not to overcook. Immediately plunge the asparagus in an ice water bath to stop the cooking and retain the green color. After a minute or two, remove the asparagus and dry well with a towel. Dress with a vinaigrette. Then you may either chill it for about an hour, or serve at room temperature. *I like to flavor my asparagus water with beef broth. It isn’t necessary, but it does bring a very nice flavor to the cooking broth.


My Carolina Kitchen’s Basic French Vinaigrette
From My Carolina Kitchen – Sam Hoffer

1 tablespoon good vinegar, or freshly squeezed lemon juice
3 tablespoons extra virgin olive oil
½ tablespoon finely chopped shallot, optional
½ to 1 teaspoon Dijon mustard to taste
Dash of hot sauce such as Tabasco
Maldon sea salt, or other good sea salt, and freshly ground black pepper to taste

Put all of the ingredients into a jar with a tight fitting lid and shake well.  Easily doubled or tripled. This also saves well in the refrigerator for a day or two. Omit the shallot, Dijon mustard, and hot sauce for a more basic vinaigrette. The mustard is used to emulsify the vinaigrette and keeps it from separating and the shallot and hot sauce bring added flavor and are highly recommended.


Here’s Asparagus Mimosa, using the basic asparagus & French vinaigrette recipe but with chopped radishes instead of capers for a nice crunch. Link to recipe here.


Another asparagus recipe that’s a winner is asparagus using a fig balsamic vinegar to make a rich, dark vinaigrette, tossed in some chopped shallots and served over crispy poached asparagus at room temperature. Link here to post and recipe.


Here I’ve served asparagus on a bed of arugula with roasted red peppers and kalamata olives. Link here to post and recipe.


Last but certainly not least is a grilled asparagus and melon salad. This is very versatile recipe in that the asparagus can be cooked outside on a grill or on a stove top grill in your kitchen. The melon and cheese make a great fresh topping, full of flavor and have real eye appeal, plus it tastes good. Link to original post and recipe here.


This will be shared with Foodie Friday at Rattlebridge Farm, Miz Helen’s Country Kitchen Full Plate Thursday, Foodie Friday at Simple Recipes, Comforts of Home Tasty Tuesday, and Food on Friday at Carole's Chatter.   

I hope everyone has a lovely Easter.

Thursday, January 23, 2014

One Potato, Two Potato, Three Potato


I have three potato recipes for you today – two are French classics - Julia Child’s Gratin Savoyard, and a French potato salad with shallots and fresh tarragon, plus an awesome stuffed baked potato from Brennan’s of New Orleans. These are some of my favorite potato recipes and I have been serving in my home for years.  We don't eat potatoes as often as we once did, but when we do, I want them to be really good. When I was recently asked if I would like to try a new variety of potatoes, I thought why not put them to the test with tried and true recipes?

The potato is the Rooster and Albert Bartlett has been growing and selling them in the United Kingdom for years. Recently Albert Bartlett partnered with independent farmers in the US to plant, cultivate and harvest the Rooster potato varietal. The potatoes themselves look very much like a large pink/red skinned potato, but during cooking their flesh turns a lovely light yellow, as you see in the photo. For more information on the potatoes, visit their website, link here.


Of course I was happy to try the potatoes. I was very pleased with how they held up in each case and highly recommend them. Rooster potatoes are available nationwide in selected Walmart stores across the US. Let’s take a look.


Gratin Savoyard 
Adapted from Julia Child’s The Art of French Cooking

This is the non-cream version of Gratin Dauphinois, that rich and decedent dish also known as Potatoes Au Gratin or Scalloped Potatoes. This goes particularly well with beef dishes. Sometimes we have this dish for lunch with a green salad – delicious.

2 pounds peeled potatoes, I used Rooster potatoes
6 tablespoons unsalted butter
1 clove of garlic
Kosher salt & freshly ground black pepper
1 cup beef broth
1 cup Gruyere cheese, grated

Preheat the oven to 425 degrees F.

Cut potatoes in thin slices and place in a bath of cold water. Butter an oven-safe dish with a tablespoon of butter (a 10” oval au gratin dish is perfect) and rub with a cut clove of garlic. Drain the potatoes and dry well with a kitchen towel. Spread half of them over the dish in a decorative pattern and sprinkle with salt and pepper. Divide over them half of the butter and cheese. Repeat with the second layer. Add beef broth to cover by three quarters, bring to a simmer * on top of the stove, and then bake in a preheated 425 degree F oven about 40 minutes, until the potatoes are tender and nicely browned on top. Serves 4, or 2 if they are very hungry.

*You can also boil the broth in a separate pan, and then add it to the potatoes right before they go in the oven, if that works best for you.


French Potato Salad
From My Carolina Kitchen

This is my favorite of all of the potato salads. Like anything else, I’ve changed it through the years. The secret of this one is to toss the hot potatoes with the wine, vermouth or hot beef broth before adding the dressing. If you are using dried tarragon, add a good handful of finely chopped fresh flat-leaf parsley for color. Since this recipe contains no mayonnaise, it can stand at room temperature for several hours and is perfect for picnics. You can see again that the potato is yellow.


12 oz. small potatoes, unpeeled, I used the Rooster potatoes
5 – 6 tablespoons extra-virgin olive oil
2 tablespoons red wine vinegar
2 tablespoons chopped shallots
Splash of white wine, dry vermouth, or hot beef broth
1 tablespoon chopped fresh tarragon, or 1 teaspoon dried, or to taste

Cook the potatoes in boiling salted water until done. Drain and when cool enough to handle, peel and cut into small slices. Toss the hot potatoes immediately with a splash of white wine, dry vermouth, or hot beef broth. Quickly whisk together the oil and vinegar and toss on the potatoes. Add the shallots and tarragon. Toss again. Let stand about 30 minutes, and then serve at room temperature. Serves 2 - 4.


Brennan's of New Orleans Stuffed Baked Potatoes

I have been making these potatoes for years from a very old Brennan’s cookbook that contained this recipe with a list of ingredients, but no exact proportions, so I’ve been winging it, always with great results. The recipe below is how much I use, but you can change it to your taste. I recently discovered that this recipe is all over the internet if you want a more complete recipe. I use less bacon fat and more Parmesan cheese than some recipes. However, beware of what you read and do not try to mash the potatoes in the food processor as one recipe recommended. The manufacturers of food processors have cautioned for years to not mash potatoes in the processor because the potatoes will likely turn to glue. If you wish to kick it up a notch, as Emeril would say, you can add slivers of smoked salmon as a garnish as above. Serves 2, easily doubled or tripled.

2 large potatoes, washed & scrubbed, I used Rooster potatoes
2 strips bacon, more if you like
1/2 cup chopped green onions, green tops included
1/2 cup sour cream (we use low-fat), or more as needed for moisture
Kosher salt and freshly ground black pepper
Freshly grated Parmesan cheese, about 5 – 6 tablespoons
A couple of pats of butter, optional (I did not use butter)
Hungarian paprika for garnish
Slivers of smoked salmon for garnish, optional

Preheat the oven to 400 degrees F. With a small sharp knife, cut a few punctures in the top of each potato and bake for 1 hour or until done. Don't wrap the potatoes in foil or the skins will get too moist.

Cook bacon until crisp. Remove bacon to a plate lined with paper towels to drain and when cool enough, crumble. Drain off bacon fat from the skillet except for about 1 tablespoon, or more if you like the bacon flavor. Add chopped green onions and sauté slowly until they soften. Set aside with the bacon.

When the potatoes are done, cut them in half lengthwise and turn the oven temperature down to 350 degrees F. Scoop out the insides of the potatoes and place in a large mixing bowl. Salt and pepper the potatoes generously and mash with a potato masher. Add the green onions with the bacon drippings, the crumbled bacon and sour cream to bind. Mix well with a spoon. Add freshly grated Parmesan cheese, stir to incorporate. Taste for seasonings and adjust as necessary. Add more sour cream if mixture is too stiff. Stuff mixture into potato skins and sprinkle with Hungarian paprika. Bake 15 to 20 minutes at 350 F or until heated through. Garnish with smoked salmon slivers if desired.


This will be shared with Foodie Friday at Rattlebridge Farm, Miz Helen’s Country Kitchen Full Plate Thursday, Foodie Friday at Simple Recipes, & Food on Friday at Carole's Chatter.   

Have a great weekend everyone.

Disclaimer: I was given a box of Rooster potatoes to try. I was not compensated for this post and the opinions here are my own.

Thursday, November 14, 2013

Spicy Roasted Butternut Squash, Feta, and Olive Salad


This is a nice spicy fall salad, filled with the flavors of the Mediterranean. The briny kalamata olives and feta cheese pair well with the spicy warm roasted butternut squash that’s been seasoned with touches of cumin and cayenne pepper and dressed with a red wine and shallot vinaigrette. We found this to be a lovely fall vegetarian lunch or a fine accompaniment to a roasted chicken or pork loin.

I don’t know about you, but I dread dealing with hard winter vegetables such as butternut squash or pumpkin. They’re difficult to cut and a challenge to peel. So I asked the green grocer to cut the butternut squash in half, which prevented me from having to enlist my husband and his trusty long French chef’s knife. Then I relied on a wide peeler to remove the skin. Believe me, a regular thin vegetable peeler would take forever and frustrate you at the same time. The wide peeler, example here from Williams Sonoma, is your best friend when it comes to peeling big hard vegetables. Roasting is definitely the way to cook butternut squash. As you can see in this photo, the high temperature gives it a nice caramelization.


Make sure to find a nice creamy feta cheese that comes in brine (heavily salted water). The dry crumbly feta just won’t get the job done here. It might look okay, but it lacks the taste and texture of the brined cheese.

We learned something the other day about olives. At an Italian market we overheard a customer order a scoop of kalamata olives with pits and Meakin asked him why, since it’s so much more convenient to buy them already pitted. He explained that the olives have more flavor with the pits, because when the pits are removed, the olive is more exposed to the brine and that affects the flavor. Interesting. I was giving up flavor for a short-cut.

Speaking of olives, Bill Granger, whose recipe I’ve adapted here, says if you find store-bought olives a bit too salty for your taste, soak them in water for an hour or two and then drain. If you want marinated olives, pour a little good extra virgin olive oil over them and add green peppercorns, garlic cloves, or other seasonings that suit your taste.

The original recipe calls for pumpkin, so feel free to substitute it or sweet potatoes for the butternut squash. Next time I would cut the olives in half lengthwise to make the olives go further in the dish. This warm and spicy salad is a definite have-again.


Spicy Roasted Butternut Squash, Feta, and Olive Salad
Adapted from Bill’s Food by Bill Granger – serves 4

3 tablespoons olive oil
½ teaspoon ground cumin
½ teaspoon cayenne pepper
Sea salt
Freshly ground black pepper
1 lb, 12 ounces butternut squash, cut into ¾” cubes
3 ½ ounces baby spinach leaves
5 ½ ounces feta cheese in brine, drained and crumbled
20 Kalamata olives, pitted (sliced in half if desired)

Vinaigrette
1 tablespoon red wine vinegar
4 tablespoons extra virgin olive oil
1 shallot, finely sliced or chopped

Preheat the oven to 425 degrees F. Measure the olive oil, cumin, cayenne pepper, salt and pepper into a small jar with a tight fitting lid and shake well to combine. Place the squash on a roasting pan large enough to hold the cubes without crowding. Pour the spices over the squash and with your hands, stir the cubes to combine with the spice mix.  Bake for 30 minutes, or until the squash is tender and slightly caramelized. Set aside to cool very slightly, yet still warm, while you assemble the vinaigrette and the salad.

Combine the ingredients for the vinaigrette in a small jar with a tight fitting lid and shake well to combine.

Divide the spinach leaves among four serving plates and scatter warm squash, feta and olives over the top. Drizzle each salad with the red wine shallot vinaigrette. Serve right away.


This will be shared with Foodie Friday at Rattlebridge Farm, Miz Helen’s Country Kitchen Full Plate Thursday, Foodie Friday at Simple Recipes, and Seasonal Sunday at the Tablescaper.

Have a great weekend everyone.

Thursday, August 15, 2013

Corn & Peppers with Sea Scallops– plus an easy way to make perfect rice & tips to selecting corn


This recipe is perfect to showcase fresh corn and is best made in the summer when corn is available in abundance. I’m of the opinion that corn is best when you can find it in the husks, straight from the farmer’s garden, or better yet from your own garden. However, it’s generally not considered kosher to pull the husks off before purchasing - meaning you buy the corn as is. I’ve actually seen customers get a dirty look from vendors at farm stands when they peel the husks, or in some cases, actually verbal reprimands from the sellers. So what is the best way to select corn? According to the website The World’s Healthiest Foods, “you should look for corn whose husks are fresh and green and not dried out. The husks should envelope the ear and not fit too loosely around it. Traditionally to enjoy the optimal sweetness of fresh corn, eat it the day of purchase. New varieties allow you three days to still enjoy its full flavor. Store corn in an air-tight container or tightly wrapped plastic bag in the refrigerator if you do not intend to cook it on the same day of purchase. Do not remove its husk because the husk protects its flavor.”

Do you have any tips on the best way you select corn?


I consider sea scallops to be a treat, primarily because they can be pricy. I think the most difficult thing about scallops is finding the correct ones. Dry pack scallops are the very best money can buy and I encourage you to seek them out. Here's a link that will explain all about dry pack scallops. I suggest that you avoid scallops that have been soaked in brine because they are very difficult to brown properly and to many people, including us, they leave a tangy aftertaste in your mouth. Scallops aren’t particularly difficult to prepare. You just need to be very careful not to overcook them, otherwise they turn out tough and chewy and very unappetizing.


We’ve seasoned the scallops with smoked sweet Spanish paprika, also called Pimenton de la Vera, to give the scallops a hint of smoked flavor. In the past smoked paprika could be difficult to find, but I’ve seen it from McCormick in my local supermarket. However, if you can find the artisan Spanish one in the red tin (La Chinta, available from La Tienda at gourmet shops and on line, link here.), I think it is superior to the supermarket ones because the artisan quality of smoked paprika is generally thought to be the best. Here’s a fun fact – Spanish paprika is grown, smoked and milled in the micro-climate of La Vera, not far from where Christopher Columbus presented the first plants to Ferdinand and Isabella.

My Mother's Easy Way to Cook rice that has never let me down 
My mother had a very easy but unusual way to cook rice and I’ll share her method with you. It always turned out perfectly, no lumps or sticky clumps, and no fancy cookers. She cooked her rice in lots of boiling salted water, the same way you cook pasta. Twenty minutes for white rice, 35 minutes for brown. After draining it well, she put the rice back in the pan, stirred in a pat of butter, and left it covered on the stove for up to twenty minutes before serving. She always used Uncle Ben’s converted rice and I’ve never used anything else, so I’m not sure how it would work with other brands. But I will add that this recipe for rice has never let me down.

My mother's perfect rice printable recipe


Fresh Corn & Sweet Red Peppers with Sea Scallops
Adapted from Sunset magazine – serves 6

6 servings of rice, prepared either according to package directions or my mother’s method above
3 ears of yellow corn, about 2 ½ lbs total, husked, silks removed
1 ¼ pounds dry pack sea scallops
Kosher salt and freshly ground black pepper
Smoked sweet Spanish paprika, also known as Pimenton
2 tablespoons butter
2 tablespoons olive oil
2 red bell peppers, stemmed, seeded, and finely chopped
1 to 2 small cloves of garlic, peeled & minced
1/3 cup chopped fresh basil leaves, plus some whole leaves for garnish
1/3 cup chopped fresh cilantro

Prepare six servings of rice. When cooked, drain well, stir in a little butter to coat the rice kernels, cover and briefly set aside on the stove while you prepare the vegetables and scallops. Right before serving, spray 6 small ramekins with cooking spray and mound rice into the molds, packing well.  Invert ramekins on the individual bowls that you plan to use for the vegetables and scallops, but do not unmold the rice yet. Let it sit in the ramekins while you prepare the vegetables and scallops.

Remove the corn from the cob with a sharp knife. I like to cut mine into a paper plate. Rinse scallops and pat dry, then sprinkle lightly with salt, freshly ground black pepper and smoked paprika.

Melt 1 tablespoons of butter with 1 tablespoon of olive oil in a 10 to 12” nonstick skillet over high heat. Add corn kernels, bell peppers, garlic and cumin and cook, stirring often, until vegetables are crisp tender, about 3 minutes, taking care not to let the garlic burn. Remove from heat and set aside.

Melt the remaining butter and oil in another 10 to 12” nonstick skillet over high heat. Cook until scallops are browned on the outside and barely opaque in the center, turning once, about 4 to 5 minutes total, depending on their size.  Take care not to overcook the scallops or they will be tough. When scallops are done to your liking, stir in the cilantro.

Just before serving, stir basil into the vegetable mixture and taste for seasonings. Spoon vegetables into wide, shallow individual bowls, gently remove ramekins off of the molded rice, then add the scallops and any pan juices and garnish with basil leaves.

Cook’s notes: I suggest doubling the recipe for the corn & peppers if you like a lot of vegetables and especially if are are going to serve more than 4 people. You could also substitute a small pasta, such as orzo, for the rice.


This will be shared with Foodie Friday at Rattlebridge Farms, Miz Helen’s Country Kitchen Full Plate Thursday, Foodie Friday at Simple Recipes, Foodtastic Friday at Not Your Ordinary Recipes, and Seasonal Sunday at the Tablescaper.

Have a great weekend everyone.

Thursday, March 28, 2013

Asparagus Paired With An Exciting New Vinegar - Fig Balsamic


Asparagus is our favorite side dish to serve for Easter. It spells springtime for me and besides, almost everyone loves asparagus. It also holds up well at room temperature on a buffet. Each year I try to find a new asparagus recipe or two to add to my ever growing list of favorites. But this year, instead of finding a new recipe, I found a new ingredient to pair with asparagus and I’m very excited about it.

It’s fig balsamic vinegar. The brand I used was O and it was award the 2012 sofi Gold winner for outstanding vinegar at the Summer International Fancy Food Show. According to O’s website, juicy, ripe California native mission figs are slowly oak aged in Sonoma in O’s California Balsamic vinegar, producing a sweet, rich, dark vinegar. To use their own words, “An elixir worthy of the monks who brought this varietal to coastal California. Delicious with prosciutto and ricotta, brushed over pork loin with fresh thyme, or simply drizzle over fresh organic strawberries or our newest flavor obsession - over vanilla bean ice cream.”  You can also find fig balsamic vinegars on line at Amazon. 

I used the fig balsamic vinegar to make a rich, dark vinaigrette, tossed in some chopped shallots, and served it over crispy poached asparagus at room temperature. Chopped Mission figs can be added to the garnish if you wish for even more fig flavor. My basic vinaigrettes are always three parts oil to one part vinegar or acid. Here is my basic recipe for poached asparagus and the vinaigrette follows.

Grilled asparagus lovers could use their favorite grilled asparagus recipe and then follow the instructions for the vinaigrette.


My Carolina Kitchen’s Basic Recipe for Poached Asparagus
From My Carolina Kitchen – Sam Hoffer

1 lb fresh asparagus, tough lower ends snapped off
Water flavored with low sodium, low fat beef broth* to taste
2 teaspoons salt

After tough ends of asparagus have been removed, peel the remaining ends unless the asparagus is thin; if thin, leave as is. Bring water flavored with beef broth and 2 teaspoons salt to a boil in a shallow pan. Add asparagus, turn heat to low and cook for about 4 minutes until asparagus is crisp tender, taking care not to overcook. Immediately plunge the asparagus in an ice water bath to stop the cooking and retain the green color. After a minute or two, remove the asparagus and dry well with a towel. Dress with a vinaigrette. Then you may either chill it for about an hour, or serve at room temperature. *I like to flavor my asparagus water with beef broth. It isn’t necessary, but it does bring a very nice flavor to the cooking broth.


Fig Balsamic Vinaigrette with Shallots
From My Carolina Kitchen – Sam Hoffer

1 tablespoon fig balsamic vinegar
3 tablespoons good extra-virgin olive oil
1 tablespoon finely chopped shallots
Maldon sea salt or other good sea salt
Freshly ground black pepper
Chopped dried Mission figs, optional

Put the vinegar, shallot, olive oil, and sea salt and pepper in a screw top jar with a lid and shake well to mix. Easily doubled or tripled. This also saves well in the refrigerator for a day or two. Toss with poached asparagus and garnish if desired with chopped dried figs. This recipe with the fig vinaigrette is especially good served at room temperature.


My other favorite Easter asparagus dish is Asparagus Mimosa, also known as Asparagus Goldenrod. If you’ve been reading My Carolina Kitchen for a while, you’ll recognize it from Easter’s past. The name Goldenrod comes from the bright green asparagus garnished with yellow egg yolk and Mimosa because the grated hard-boiled eggs resemble mimosa blossoms.  Classic dishes such as this were a mainstay on the menus of the grand hotels in a bygone era. This year I spiffed it up a little and added some chopped radishes to the egg garnish. Prepare the asparagus from the basic recipe above.

You could also grill the asparagus and then follow the vinaigrette & garnish recipe.

My Carolina Kitchen’s Basic French Vinaigrette
From My Carolina Kitchen – Sam Hoffer

1 tablespoon good vinegar, or freshly squeezed lemon juice
3 tablespoons extra virgin olive oil
½ tablespoon finely chopped shallot, optional
½ to 1 teaspoon Dijon mustard to taste
Dash of hot sauce such as Tabasco
Maldon sea salt, or other good sea salt, and freshly ground black pepper to taste

Put all of the ingredients into a jar with a tight fitting lid and shake well.  Easily doubled or tripled. This also saves well in the refrigerator for a day or two. Omit the shallot, Dijon mustard, and hot sauce for a more basic vinaigrette. The mustard is used to emulsify the vinaigrette and keeps it from separating and the shallot and hot sauce bring added flavor and are highly recommended.


Asparagus Mimosa, also known as Asparagus Goldenrod
From My Carolina Kitchen – Sam Hoffer

Prepare My Carolina Kitchen’s Basic Recipe for poached asparagus. Dress with My Carolina Kitchen’s Basic French Vinaigrette above, using tarragon vinegar as the vinegar of choice. Garnish with a chopped hard-boiled egg at room temperature and some chopped radishes. I like to serve Asparagus Mimosa slightly chilled.


* * *

This will be shared with Foodie Friday at Rattlebridge Farms, Miz Helen’s Country Kitchen Full Plate Thursday, Foodie Friday at Simple Recipes, Foodtastic Friday at Not Your Ordinary Recipes, Seasonal Sunday at the Tablescaper, and On the Menu Monday at Stone Gable.

Have a great weekend everyone.


Monday, November 19, 2012

Green beans and oyster mushrooms tossed in a nut oil vinaigrette – a modern take for a Thanksgiving side dish


Like many of you I’ve been thinking of what to serve as side dishes for Thanksgiving this year. I’m in the mood for fresher, more modern sides that compliment the turkey and not add any more richness than necessary to the meal - more 21st century if you will. Two of my favorite bloggers have inspired my green bean dish.

Cathy at Wives with Knives posted a very attractive haircots verts salad with hazelnuts and gorgonzola tossed in a balsamic vinaigrette, recipe here, that can be served at room temperature. If you’re like me and have a hard time finding hazelnuts and often skip them because of that reason, Cathy’s Bavarian Nut Company now sells hazelnuts on line here, so consider that problem solved.

Joan at Foodalogue made-over the old 1950’s green bean casserole made with mushroom soup & topped with fried onions with a very inspired Italian green bean and porcini mushrooms dish with Parmesan Béchamel, recipe here. She creatively topped it with fried spaghetti to replace the standard canned onions. I know you will love both dishes.

Here’s my take on Thanksgiving green beans this year– crispy green beans & meaty oyster mushrooms tossed with a tangy shallot & nut oil vinaigrette and garnished with toasted walnuts. As Cathy said, a salad can be made in advance and that is a real plus at Thanksgiving when every available burner on your stove is prime real estate.

The nut oil vinaigrette is one of our favorite vinaigrettes and is fabulous tossed with baby greens and garnished with blue cheese crumbles. And it’s another reason to have a bottle of sherry vinegar on hand.

We will be guests this year for Thanksgiving dinner at the home of my brother-in-law, who is a diabetic. I always make sure I take at least one dish that suits his diet. It’s just the nice thing to do as a guest don’t you think? There’s no reason to save this salad for Thanksgiving. It’s perfect any time of the year and can easily be doubled and tripled for a crowd.


Green beans and oyster mushrooms tossed with a walnut oil vinaigrette 
From My Carolina Kitchen – serves 4 to 6 – easily doubled

1 pound fresh green beans, stems removed
¼ pound fresh oyster mushrooms, stems removed, gills cleaned if necessary, torn or cut in half
1 tablespoon olive oil
1 teaspoon dry sherry
A handful of walnuts as a garnish, optional but delicious

Nut oil vinaigrette:
2 tablespoons peeled & minced shallots
2 tablespoons sherry vinegar
2 tablespoons walnut or hazelnut oil
2 tablespoons grapeseed oil, or other neutral flavored oil such as canola
Maldon salt or other coarse sea salt
Freshly ground black pepper

Bring a large pot of salt water to boil over high heat. Heat the olive oil in a large skillet over medium high heat and add the trimmed & sliced mushrooms. Stir the mushrooms frequently while cooking. When the mushroom liquid has evaporated completely, cook another minute or two to brown slightly. Off of the heat, add the sherry and stir. Return to the heat, stir well for a moment, then turn off the heat and leave the mushrooms to rest in the skillet for now.

Combine the ingredients for the vinaigrette in a jar with a tight fitting lid, shake well and set aside.

Drop beans into boiling water, cover, and bring the water back to a boil. When water returns to a boil, remove the cover and turn heat down to medium and cook until beans are crispy tender, about 7 minutes, depending on the size of your beans. Drain beans well, place in a large bowl, and toss with the vinaigrette, a little bit at a time, tasting while you go, over the still warm green beans. You will probably have some vinaigrette left over, which will keep well in the covered jar in the refrigerator for another green salad.

In the meantime, toast the walnuts in a dry pan over medium heat, shaking the pan constantly to prevent burning. Continue to toast the nuts until they begin to brown and become fragrant. Remove the nuts to a cutting board, allow to cool slightly, then chop very coarsely and set aside.

Add mushrooms to the beans and toss well. Taste for seasonings. Pile high on a platter and garnish with the toasted walnuts if desired. Can be served right away or at room temperature.

* * *

Cookbook give-away results

Thank each of you that participated in the cookbook giveaway. The winner of Foolproof by Ina Garten is Ocean Breezes & Country Sneezes. The winner of Savoring the Hamptons is Savoring Time in the Kitchen. Congratulations to you both. Please contact me at samhoffer (at) gmail (dot) com with your mailing address.

This will be linked to On the Menu Monday at Stone Gable and Foodie Friday at Rattlebridge Farms & Food on Friday at Carol's Chatter.


Thursday, June 7, 2012

A Feast for Special Friends by the Hoffer Brothers with a Spectacular Flaming Grand Finale


Bananas Foster

As you know from my last post, we attended an authentic Cajun crawfish boil at a blogger get-together at Almost Heaven South on Tellico Lake over Memorial Day weekend. Our host, Larry of Big Dude’s Eclectic Ramblings, and his wife Bev, invited Meakin and myself, along with my brother-in-law Stuart and his wife Sandy, to spend an extra night with them at their home. I’d bragged to Larry about what wonderful cooks Meakin and Stuart are and how well they work together in the kitchen and with that he challenged them to prepare dinner for him in his kitchen on our last night together. Of course the Hoffer brothers, always up for a challenge, immediately said yes. Here is their menu.


Dinner at Almost Heaven South 
Monday, May 28, 2012
Guests Chefs – Stuart & Meakin Hoffer

Appetizer

Savory Bleu Cheese Popovers

First Course

Chilled Spanish Gazpacho Soup with  Crispy Croutons

Entrée

Roasted Tenderloin of Beef
Napped with a Peppery Port Wine & Fig Reduction  
Garnished with Caper Berries

Mediterranean Style Ratatouille

Truffle Infused Mashed Potatoes

Crispy Fried Shallots

Cheese Course

Four cheeses with Honey Rosemary Glaze

Dessert

New Orleans Style Bananas Foster over Vanilla Ice Cream

Coffee


After the crawfish boil and a cruise around the lake on Larry’s party boat, before we went to bed Meakin laid the beautifully trimmed beef tenderloin on a rack on a sheet pan, salted it heavily, and put in the refrigerator to rest overnight.

Photo courtesy of Big Dude's Eclectic Ramblings
beef tenderloin resting overnight
The next morning we got up and started our day with a big “Larry style breakfast.” If you read Larry’s blog, you know Larry is the king of breakfast.  As a special treat, he had prepared homemade scrapple. Read more and see the amazing breakfast Larry prepared here. It was, needless to say, out of this world and you won’t find better anywhere on the planet. In fact we were so stuffed that we lazed around the remainder of the morning and everyone took a nap in the afternoon in anticipation of the evening meal.

Around five, we all gathered in Larry’s kitchen to watch Meakin & Stuart start their prep work for dinner. Stuart passed around his savory mini blue cheese popovers and we nibbled on them while Larry poured a glass of wine for everyone.

Photo courtesy of Big Dude's Eclectic Ramblings
Stuart & Meakin
As you might imagine, the challenge of this dinner came, not in planning the menu, but the logistics of preparing a 5 course dinner in someone else’s kitchen. It turns out that Larry & Bev have one of the finest kitchens known to man and stocked with everything conceivable a cook would want. They’ve thought of everything – a fancy six burner stove, every utensil imaginable, double dishwashers, huge built-in oven with a convection microwave above, a large pantry with more spices than one could dream of, and tons of chef quality sharp knives. Why even the food processor is built in – open a door below the island and out it pops, ready to go to work on any project.

Here everyone enjoys Stuart’s Spanish gazpacho for our first course.

L to R - Stuart, Bev, Larry, Sandy, Pat, me
The entrée was Meakin’s roasted tenderloin of beef napped with a peppery port & fig reduction garnished with caper berries, truffle infused mashed potatoes, crispy fried shallots, and Stuart’s Mediterranean style ratatouille.


Fig & Port Wine Sauce
Adapted from Cooking Light – serves 8

1 1/2 cups tawny port
½ cup beef broth
2 ½ tablespoons finely chopped shallots
12 small dried figs, quartered
1 - 6” sprig of fresh rosemary
2 tablespoon drained small capers
1 tablespoon of caper juice
Kosher salt and plenty of freshly ground black pepper
2 oz brandy
2 oz slurry of arrow root and water
2 tablespoons cold unsalted butter
4 -5 caper berries

Combine all of the ingredients down to the brandy, in a small saucepan and bring to a boil. Boil 15 minutes or until reduced to 1 cup. Remove rosemary sprig. Strain and return to the pan. Taste for seasonings, add the slurry and heat over a moderate flame. When thickened, add the brandy and flame. When the flame has died down, swirl in a knob of butter and then spoon sauce over steak and garnish with caper berries.

Some people, including Meakin, are never too sure they like eggplant, which just happens to be the main ingredient in ratatouille. Stuart’s recipe is the only one that has ever pleased Meakin. Even Larry was a bit leery, but said afterwards, “I even liked the ratatouille, which was a first.” Way to go Stuart.

Ratatouille Mediterranean
Adapted from the New York Times Cookbook and the Joy of Cooking

2 ½ cups diced eggplant (2 small ones)
1/3 cup olive oil
¾ cup thinly sliced onions
2 clove garlic chopped
½ cup black pitted olives
2 green or red peppers julienned
3 cups zucchini in ½ inch slices
2 cups skinned, seeded, quartered tomatoes
3 tablespoons capers
Italian Herbs (dried) or oregano
Salt & pepper to taste

Peel and slice the eggplant into rounds, then salt and place the slices on a rack to drain over the sink for 30 minutes.  At the end of the 30 minutes, wipe off the salt and dice.

In a deep skillet sauté the onions and garlic until lightly brown, add the olives, peppers, zucchini, tomatoes, and drained & diced eggplant in olive and sprinkle with the herbs. Simmer the mixture, covered, over low heat for about 45 minutes, then uncover and continue to cook for an additional 15 minutes to reduce the liquid. Taste and season to taste with additional salt & pepper if needed and serve.


The cheese course was an assortment of four cheeses, saga blue, brie, Irish cheddar, and limburger accompanied by a smear of rosemary infused honey on individual cheese boards.


The finale of the dinner party was the dessert - Bananas Foster. If you’ve ever been to Brennan’s Restaurant and they’ve prepared their fabulous Bananas Foster for you tableside, then you know what a special dessert it is. It happens to be one of Meakin’s specialties and he prepared it often when we lived in the Bahamas with tiny fingerling bananas that grew in our garden. We weren’t able to find the fingerling bananas, but keep your eyes out for them. They are petite, sweet bananas with bright yellow flesh and are normally sold by a bunch with small “hands” that contain ten to twelve “fingers.”  Children love them. You can sometimes find them in Asian markets and I have, on occasion, even seen them in our supermarket. Here’s a photo I found on the web.

To make the flame sparkle when you’re flambéing that will remind you of fireworks on the 4th of July, don’t miss the tip about sprinkling the flames with a little ground cinnamon held high.


Bananas Foster
Adapted from Brennan’s of Houston in Your Kitchen by Chef Carl Walker – serves 4

½ cup unsalted butter
1 cup packed brown sugar
1 tablespoon banana vodka or other banana flavored liquor
6 tablespoons dark rum, divided
4 ripe bananas, peeled, sliced lengthwise, and halved again into quarters
½ teaspoon cinnamon plus more for sprinkling into the flame
4 scoops vanilla ice cream

In a flat sauté pan or medium skillet, add butter, sugar and, banana vodka, and 2 tablespoons rum. Cook over medium-high heat while stirring to melt. Add bananas. Use a table fork to lightly prick bananas while they cook. Sauté about 1 minutes, or until bananas began to soften.

Carefully tilt the pan towards you to get top half of the pan hot, then remove the pan from the heat. (Removing the pan from the heat is an important step, because it is not safe to ever pour liquor straight from the bottle into a hot pan.) With the pan off of the heat, pour remaining rum over the bananas.

To flambé bananas, carefully ignite rum by either tilting pan towards flame on a gas range or cautiously lighting with a long taper match.

Tip: Gently shake flaming pan with one hand and hold a shaker of cinnamon high above the flame and sprinkle some over the flame with the other hand. By sprinkling the cinnamon directly into the flame, it creates a Fourth of July effect that is pure food magic!

When the flames die out, immediately spoon bananas and their sauce over ice cream.

Cinnamon being sprinkled into the flames to make sparkles
A big thank you Larry & Bev for your gracious hospitality and allowing us to prepare dinner as a thank you from us for hosting your 3rd annual world famous Tennessee blogger get-together on your dock on Tellico Lake. Since my photographer was busy cooking, I also want to thank Larry for allowing me to use some of his photos from the dinner party.

Don’t you just love this photo that Larry took of the two chefs sitting down to a bowl of Stuart’s gazpacho?

Photo courtesy of Big Dude's Eclectic Ramblings
L to R - Sandy, Pat, me, Meakin, Stuart, Bev

* * *

This will be linked to Foodie Friday at Rattlebridge Farms, Foodie Friday at Not Your Ordinary Recipes, Miz Helen’s Country Kitchen Full Plate Thursday, and On the Menu Monday at Stone Gable. Stop by and join in the fun.