Thursday, July 31, 2014

Orzo Salad – makes enough to feed a crowd


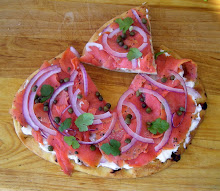
This orzo salad makes enough to feed a crowd and is perfect for entertaining because it can be made ahead and served at room temperature. For a more substantial meal, add some chopped grilled chicken breasts. I’ve come to love orzo because it cooks so much faster than rice and has a softer, creamier texture.

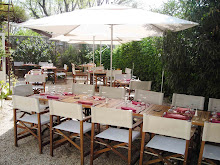
I don’t know about you, but I’m always a bit stymied when asked to bring a dish to a party. My criteria when choosing a party recipe is that 1) it must be pretty and 2) it must taste as good as it looks. This is especially essential if it’s going to sit on a buffet table with other dishes.


This salad fits the bill on both. There is a lot of color and flavors going on in this dish – smoky grilled red, orange and yellow roasted bell peppers with a little char, green English peas, crunchy grilled red onion, bright green fresh herbs from the garden and juicy ripe red tomatoes combined with al dente orzo and dressed with a lively mustard vinaigrette.

If you like dishes that can be made ahead, this salad is even more delicious the next day after the flavors have had time to blend together. I would advise that if you do make it ahead, add the fresh herbs at the last minute to retain their color and freshness.

We took this salad to a get-together over the 4th of July weekend and it was a real hit. It tastes as good as it looks and is also very pretty on a buffet table. I recommend taking a copy or two of the recipe with you because you’re bound to be asked for the recipe.


Orzo Salad
Adapted from Williams-Sonoma On the Grill, by Willie Cooper, serves 8 to 10
Printable Recipe

16 ounces (1 lb) dried orzo pasta
Kosher salt, to taste
1 cup fresh or frozen English peas
2 tablespoons olive oil
1 each red and white onion, cut into slices 1/2 inch thick
1 each red, orange and yellow bell pepper
1 cup of fresh basil, cut into a chiffonade, or minced fresh flat-leaf parsley, or a combination of both
12 small heirloom tomatoes, about 3 lb. total, cored and quartered or 15 or so grape tomatoes cut in half
Vinaigrette recipe below
Fresh basil leaves for garnish

Bring a large pot three-fourths full of salted water to a boil over high heat. Have a bowl of ice water ready. Add the orzo to the boiling water, stirring with a large spoon to prevent sticking. Return the water to a boil and cook the orzo until al dente (tender but firm to the bite), 10 to 12 minutes, adding the green peas during the last minute of cooking. You don’t want to overcook the peas. Drain in a colander. Pour the orzo and peas into the ice water and drain again. Transfer to a salad bowl. Drizzle with 2 tablespoons olive oil and stir to coat. Cover and refrigerate.

In the meantime, make the vinaigrette, recipe below. Combine the olive oil and grapeseed oil in a glass measuring cup. Whisk together the vinegar and mustard in a non-aluminum bowl. Add the oils in a slow steady stream, whisking constantly. Season with salt and pepper and set aside.

Prepare a hot fire in a grill. Brush and oil the grill grate and a vegetable-grilling basket. Brush the onions and bell peppers with olive oil. Arrange the onions in the grilling basket and place directly over high heat. Grill, turning once, until the onions are nicely charred on both sides, 8 to 10 minutes per side. Transfer to a plate. Grill the bell peppers directly over high heat, turning occasionally, until nicely charred on all sides. Transfer to a bowl, cover and let steam for 10 minutes. When the peppers are cool enough to handle, using your fingers, a paring knife or a fork, peel them and discard the skins. Seed and dice the peppers.

Remove the orzo and peas from the refrigerator and add the vinaigrette, peppers, onions, basil or parsley and chopped grilled chicken (if using) to the bowl and toss to coat. Add the tomatoes, then taste and adjust the seasonings with salt and pepper. (I also added a couple of tablespoons of vinegar.) Can be served cold or at room temperature. Serves 8 to 10.


Vinaigrette:

1/4 cup extra-virgin olive oil, plus more for brushing
1/2 cup grapeseed oil or other neutral tasting oil
2 tablespoon red wine vinegar, plus more as needed
1 tablespoon good Dijon mustard
Freshly ground black pepper, to taste

For a more substantial salad or with leftovers the next day, add some chopped grilled chicken breasts. As long as you have the grill on, throw some boneless chicken breasts on to add now or later.


For better viewing, click photos to enlarge. 

This will be shared with Foodie Friday at Rattlebridge Farm, Miz Helen’s Country Kitchen Full Plate Thursday, and Foodie Friday at Simple Recipes.    
Have a great weekend everyone.

Monday, July 28, 2014

Summer Flowers


Our summer flower garden is in full bloom. Here are some of our favorites, including the crepe myrtle above.


Mr. Bee at work on the purple cone flowers


Black Eyed Susans 


Mr. Bee is quite busy in the garden today


Purple cone flowers


 Perennial garden along the split rail fence


Crepe myrtle

Flowers feed the soul. Photos can be enlarged by clicking on them.

This will be linked to Garden Tuesday at Sidewalk Shoes.

How does your garden grow?


Thursday, July 24, 2014

Tomatoes and Peaches – a taste of summer


I enjoy dishes such as this that introduce a new flavor combination along with garden freshness. It’s interesting to see how a single ingredient that tastes amazing all on its own can be put together with another equally amazing ingredient to create a totally different flavor. The wonderful sweetness of ripe peaches and the rich, tangy flavors of local tomatoes are out-of-this-world fabulous together.

I have two elegant and easy recipes today that taste every bit as good as they look. Not only are they eye-catching, they are full of flavors we all associate with summer. Both of these salads are the star of the show and a very nice change from your normal salads. Think of each bite as “a mouthful of summer.”

The idea of tomatoes and peaches together is interesting. Back in 2011 when I wrote a post, link here, for homegrown tomatoes stuffed with local peaches, photo below, some questioned the combination. I admit that it was a bit unusual. Fast forward to 2014 and google “tomato and peach salads” and you’ll find a plethora of them. After all, tomatoes are considered a fruit.


The first recipe is a stacked tomato salad. I’ve used heirloom tomatoes, this time Cherokee Purples, and inserted slices of black pepper-coated goat cheese, stacked upright and topped with peaches, crunchy cucumber, grilled local corn, chopped red onion, fresh basil, and drizzled the tomato stacks with savory vinaigrette.


Stacked Tomatoes
Idea for stacked tomatoes inspired by Cooking Light – serves 4
Printable Recipe

4 medium sized tomatoes (preferably heirlooms, I used a Cherokee Purple)
Kosher salt
4 ounces goat cheese (I used one coated with black pepper)
1 cup chopped European seedless cucumber, or garden cucumber, seeds removed
1 cup fresh corn kernels, grilled or blanched
½ cup chopped red onion
2 fresh peaches, peeled, pit discarded, cut into cubes
¼ cup fresh basil leaves, julienned
Sea salt & freshly ground black pepper

Vinaigrette:
1 tablespoon freshly squeezed lemon or lime
3 tablespoons extra-virgin olive oil
Several dashes of hot sauce such as Tabasco, optional

Wash the tomatoes, then slice them into ½ inch slices and sprinkle with salt. Stack each tomato with slices of goat cheese between the layers and place on individual plates. You can use a couple of toothpicks to keep them upright.

Combine the cucumber, corn, and red onion in a bowl and gently toss with a rubber spatula. Combine the vinaigrette ingredients together in a jar with a tight fitting lid and shake well.

Just before serving, prepare the peaches and fresh basil and add them to the vegetable mixture. Toss very gently with a rubber spatula, then add the vinaigrette and sea salt and freshly ground black pepper and toss again, gently. Taste for seasonings and adjust accordingly. Top each tomato stack with the vegetables and serve at once. Be sure to remove toothpicks, or ask your guests to do so, before eating.


The second recipe is basically the same ingredients minus the goat cheese, but put together differently. This time, instead of slicing the tomatoes and stacking them, I hollowed them out and stuffed them with the peaches, cucumber, corn, red onion, and basil mixture.

Think of this as two recipes for the price of one.

Summer Stuffed Tomatoes
My Carolina Kitchen – Sam Hoffer – serves 4
Printable Recipe

4 medium sized tomatoes
Kosher salt
1 cup chopped European seedless cucumber, or garden cucumber, seeds removed
1 cup fresh corn kernels, blanched or grilled
½ cup chopped red onion
2 fresh peaches, peeled, pit discarded, cut into cubes
¼ cup fresh basil leaves, julienned
Sea salt & freshly ground black pepper

Vinaigrette:
1 tablespoon freshly squeezed lemon or line
3 tablespoons extra-virgin olive oil
Several dashes of hot sauce such as Tabasco, optional

Wash the tomatoes, then cut the tops off and carefully scoop out the flesh and seeds with a spoon. Sprinkle the tomatoes with salt and turn them upside down on a paper towel so the excess water will drain out.

Combine the cucumber, corn, and red onion in a bowl and gently toss with a rubber spatula. Combine the vinaigrette ingredients together in a jar with a tight fitting lid and shake well.

Just before serving, prepare the peaches and fresh basil and add them to the vegetable mixture. Toss very gently with a rubber spatula, then add the vinaigrette and sea salt and freshly ground black pepper and toss again, gently. Taste for seasonings and adjust accordingly. Stuff vegetables into the prepared tomatoes and serve at once.


I think you’ll be pleasantly surprised with the tomato peach combination and begin to understand why they say, “What grows together, goes together.”


This will be shared with Foodie Friday at Rattlebridge Farm, Miz Helen’s Country Kitchen Full Plate Thursday, and Foodie Friday at Simple Recipes.    
Have a great weekend everyone.

Thursday, July 17, 2014

Lobster Rolls – a quintessential summer favorite


Lobster rolls are a quintessential favorite and they always remind me of trips to Maine, where lobsters are plentiful in the summer. Now most good supermarkets and seafood stores carry live Maine lobsters, making them readily available everywhere.

As in the case of many sandwiches, you don’t need a recipe. All you need is cooked lobster meat, good mayonnaise, preferably homemade, some finely chopped celery for crunch, a bit paprika or cayenne for spice, fresh lemon juice, salt, pepper, and tarragon, chives or parsley for a nice fresh herby flavor, buttered hot dog roll and you’re in business.


Some people are squeamish about handling a live lobster and understandably so. I’m fortunate my husband was willing to plunge him in the boiling water for me. Here’s a link to excellent instructions on how to cook Maine lobsters from the Maine Lobster Marketing Cooperative. Just for fun, we also included spiny lobsters in our sandwich because they were the lobsters of choice when we lived in the Bahamas. Here’s a link on how to cook spiny lobster tails.


If you follow the instructions below from The Summer House Cookbook on how to remove the meat from Maine lobsters, you’ll be all set.


Here’s an outline for how we made our lobsters rolls, yielding 4 sandwiches. We started making the lobster salad by placing picked over meat from 2 (1 ¼ pound) cooked Maine lobsters and also included the meat from 2 (6 ounce) cooked spiny lobsters in a large bowl. Set the salad aside while you make the dressing. If desired, it can be made ahead several hours and kept covered in the refrigerator.


For the dressing, in a bowl we combined about a 2 to 3 tablespoons of homemade mayonnaise or good quality store-bought mayonnaise such as Hellman’s, (some people like more mayonnaise so use your own discretion), a rib or two if they are small of finely chopped celery, some chopped fresh tarragon or chives, a good squirt (a couple of teaspoons) of fresh lemon juice, a shake or two of sweet paprika, and a pinch of cayenne if desired if you like a bit of spice, then season with kosher or sea salt and freshly ground black pepper. Mix well and taste for seasonings, then carefully fold some of the flavored mayonnaise into the chunks of cooked lobster. Taste again and correct as necessary with more mayonnaise or seasonings. You want the flavored mayonnaise to moisten the lobster without overwhelming it.

To assemble the sandwich, toast 4 hot dog rolls (split top if you can find them) until they are golden brown, taking care not to let them burn. Brush with melted butter, divide the lobster salad equally among each roll and serve at once. We like chips and a pickle on the side.

For more precise recipes, check out these links - Martha Stewart, Bon Appetit, Food & Wine, and Fine Cooking. You'll notice that the proportions of lobster to mayonnaise vary quite a bit, so it really all comes down to a matter of taste.


If there’s a secret to great lobster rolls, I would say it’s to use homemade mayonnaise. Mayonnaise is one of the best tasting things you’ll ever make at home and so much better than store-bought. It can elevate a simple sandwich from ordinary to sublime.

When I was growing up, my mother made her own mayonnaise and there was always a jar in our refrigerator.  She used a hand-held mixer, dripping the oil in very slowly until the eggs and oil came together to form an emulsion. It was a tedious project. Now thanks to the food processor, mayonnaise is very easy to make, utilizing that tiny hole in the feed tube to do the dribbling for you, making your job a whole lot easier. Below is Julia Child’s food processor mayonnaise and it is a snap to put together.

The best tip for making homemade mayonnaise is to have all of the ingredients at room temperature and use very fresh eggs. As with anything made with raw eggs, caution should be taken not to leave it out too long or it will spoil.


Julia Child’s Food Processor Mayonnaise
Printable Recipe

1 whole egg, at room temperature
2 egg yolks, at room temperature
1 teaspoon Dijon mustard, at room temperature
½ teaspoons kosher salt
¼ to ½ teaspoon sugar
Dash of Tabasco sauce, or other hot sauce
1 tablespoon freshly squeezed lemon juice
2 cups fine fresh oil such canola, safflower, extra-virgin olive oil, or a combination, at room temperature

Using the metal blade in the food processor, process the egg, the egg yolks, mustard, salt, sugar, and Tabasco 30 seconds. Add lemon juice and process 30 seconds more.

In a very thin stream, pour in the oil, using droplets at a time. In a food processor there is a tiny hole in the lid that will allow the oil to drop in very slowly. As the mayonnaise comes together, you can pour the oil a little faster. When all of the oil is gone, remove the processor cover and check for consistency and taste for seasonings. You may wish to add more lemon juice, kosher salt, or freshly ground white pepper. Driblets of cold water added now make a milder and lighter taste and texture. Store the mayonnaise, covered, in the refrigerator for about a week.


Photos can be enlarged by clicking on them.

This will be shared with Foodie Friday at Rattlebridge Farm, Miz Helen’s Country Kitchen Full Plate Thursday, Foodie Friday at Simple Recipes and Food on Friday at Carole's Chatter.     
Have a great weekend everyone.


Thursday, July 10, 2014

Peachy Blueberry Salsa with Grilled Pork Chops – to celebrate fresh peach season


Fresh southern peaches have arrived in our markets and that’s always a reason to celebrate at our house. Peach season is relatively short, so we try to incorporate fresh peaches into as many dishes as we possibly can. The recipe I’ve featured today is, for me, all about the fresh peaches.

Sweet juicy peaches combined with fresh blueberries and hot pepper jelly make for a sweet and spicy condiment for grilled bone-in pork chops, but would also be excellent on a cheese tray spooned over goat cheese or creamy Brie and served with a crisp white wine.

You've probably noticed that I use spicy fruit salsas often in my kitchen and although I've talked about it in the past here, I thought new readers might be interested in how that came about. I fell head-over-heels in love with spicy fruit salsas  when they were served with a fresh tuna roll at Little Moir's Food Shack, a very popular fish joint in Jupiter, Florida. I had never tasted anything like it before - the salsas were sweet, spicy, and hot all at the same time and burst in my mouth with fabulous new-to-me flavors. Mike Moir, the owner of The Food Shack, says his food is "a simple twist of taste," but I call it falling in love with incredible flavor combinations. Spicy, sweet, and hot salsas are a "party in your mouth." I hope you'll fall in love with them as much as I have.

I’ve broken down today's recipe into three parts – peachy blueberry salsa, grilled pork chops, and the all-purpose pork brine because all three recipes are worthy of standing-alone.

But first the peachy blueberry salsa – my favorite part of this meal of course.


Peachy Blueberry Salsa
Adapted from Southern Living, makes about 3 cups
Printable Recipe

1 large peach, or 2 small peaches
1 ½ cups fresh blueberries
2 tablespoons hot pepper jelly (I used red)
1 tablespoon olive oil
Zest and juice of 1 lime
1 small shallot, finely chopped
3 tablespoons chopped fresh basil
3 tablespoons chopped fresh chives
Kosher salt and freshly ground black pepper

Peel and dice one large or two small peaches. Coarsely chop half of the blueberries and leave the remainder whole. Set aside with the diced peaches. Combine the hot pepper jelly, olive oil, zest and juice of 1 lime in a large bowl and mix well. Add the peaches, blueberries and remaining ingredients and stir carefully. Serve immediately or cover and chill up to 24 hours. Best in my opinion served immediately. Salsa is perfect as a condiment for grilled pork chops or chicken and also excellent on a cheese tray with goat cheese or Brie.


Grilled Pork Chops with Peachy Blueberry Salsa
Adapted from Southern Living – serves 4
Printable Recipe

4 - 1 ½” thick bone-in pork chops (about 3 ¼ pounds total)
All purpose pork brine, recipe below
1 tablespoon oil
Kosher salt and freshly ground black pepper
Peachy Blueberry salsa, recipe above

Place chops and brine in a large zip-lock plastic freezer bag and chill for 8 hours. It’s smart to place the freezer bag in a shallow dish to prevent spills.

Remove the chops from the brine and discard brine. Let pork come to room temperature, about 30 minutes, and pat dry. Light one side of the grill, heating to 350 to 400 degrees F (medium-high), leaving the other side unlit. Brush pork chops with the oil and sprinkle with salt and pepper. Place pork over lit side and grill, covered with grill lid, for 4 minutes on each side. Transfer to unlit side and grill, covered with grill lid, 8 to 10 minutes on each side or until meat thermometer inserted in thickest portion registers 150 degrees F. Remove from heat and let stand 4 minutes. Arrange pork on serving platter and top with peachy blueberry salsa. Serve right away.

All-Purpose Pork Brine
Adapted from Southern Living, yield 1 ½ quarts
Printable Recipe

1 ½ quarts hot water
3 tablespoons kosher salt
2 tablespoons chopped fresh thyme
2 tablespoons brown sugar
2 teaspoons freshly ground (coarse) black pepper
4 garlic cloves, crushed
2 bay leaves
½ of large lemon, sliced

Stir together all of the ingredients in a large stockpot until salt and sugar dissolve. Let stand 1 hour.


This will be shared with Foodie Friday at Rattlebridge Farm, Miz Helen’s Country Kitchen Full Plate Thursday, and Foodie Friday at Simple Recipes.    
Have a great weekend everyone.

Wednesday, July 2, 2014

Pizza on the Grill


You don’t have to have a wood-fired oven to get great pizza. Pizzas can be cooked at home on your grill. The other night we watched Bobby Flay grill really great tasty looking pizzas on his charcoal grill and decided to give it a try. It looked simple enough – Bobby just punched out his dough, brushed it with a little oil, seasoned it with salt and pepper and threw it on a hot grill, turned it once, and in minutes he had a nice crispy grilled pizza, ready for the toppings. We made two different grilled pizzas - one with slow roasted tomatoes, fresh mozzarella and basil and the other with fresh mozzarella topped with a lemony arugula salad.

Pizza with quick-rise dough
I usually make a simple quick-rising dough using the food processor, shown above and link here, with our homemade tomato sauce and top it with fresh tomatoes and basil. However today we took a short cut and purchased dough from the deli of our local supermarket. Some supermarket dough is better than others (Publix has a great one).

Pizza dough is simple to make at home and next time, if I’m not near a Publix, I will make my own. In addition to my quick rise dough recipe above made in the food processor, I can also recommend a very tasty recipe for homemade dough that we found in the New York Times from pizza mavens Roberta’s in Brooklyn (I know how wonderful this recipe is because my brother-in-law made this dough recently), link to Roberta’s recipe here, and another link to how they make their dough here.

We used Bobby Flay's method of grilling pizza. Bobby says instead of oiling his grill, he prefers to brush his food with the oil and don't forget to season your food with salt and pepper. Bobby uses tongs to flip his pizzas and so did we. We found it was a lot of fun to be outside, enjoying the weather while we flipped pizza dough and the pretty grill marks and crusty edges are part of the reward.

If you're having a cook-out this weekend, shake it up a bit and throw some pizza dough on the grill.


Grilled Pizza with Slow-roasted Tomatoes, Fresh Mozzarella, and Fresh Basil
Grilled pizza dough instructions adapted from Bobby Flay
Topping - My Carolina Kitchen – Sam Hoffer, serves 2
Printable Recipe

1 pound ball of pizza dough, homemade or store bought, brought to room temperature if refrigerated
Kosher salt and freshly ground black pepper
4 ounces fresh mozzarella, cut or torn into small pieces
4 tablespoons freshly grated Italian Parmigiano-Reggiano cheese
Slow-roasted tomatoes, recipe below
Fresh basil leaves, torn or if small, left whole

Punch and stretch out the pizza dough with your fingers until you reach a desired shape, round or slightly elongated, your choice (not all pizzas have to be round.) Heat a gas or charcoal grill to high and when very hot, brush both sides of the dough with oil and season with salt and pepper. Grill until golden brown on both sides (use long tongs to flip them), about 2 minutes per side. Remove the pizza to a flat surface (we slid ours on a pizza peel dusted with cornmeal) and top first with the mozzarella, then sprinkle with the Parmesan cheese, and finally arrange the slow-roasted tomatoes on top of the cheeses. Slide the pizza back on the grill, cover and heat just long enough for the mozzarella to melt & become bubbly, about a minute. Remove the pizza and top with basil leaves. Basil leaves tend to turn dark when they get hot, so leave them for last minute. Serve immediately.


Slow Roasted Tomatoes
Adapted from Cooking for Friends from Williams Sonoma, serves 4 – 6
Printable Recipe

Preheat the oven to 300 degrees F. Slice 8 to 10 plums tomatoes in half lengthwise and arrange on a lightly oiled rimmed baking sheet, cut side up. Be careful, the tomatoes will want to slide around. Drizzle with about 4 tablespoons extra-virgin olive oil and sprinkle evenly with some sugar, about a teaspoon, then thinly sliced garlic, a clove or two depending on their size, and plenty of crunchy sea salt and freshly ground black pepper. Roast until the tomatoes turn a deep red and are wrinkled, which should take about 2 to 2 ½ hours. Remove them from the oven and let cool on the baking sheet. They are good warm or at room temperature.


For a nice twist to a pizza, top it with a freshly dressed salad. In this case I used a lemony arugula salad, but you could use any young greens. Roberta’s pizza in the New York Times used arugula, as well as my brother-in-law when he made the NY Times version of this recipe, so I followed suit.

All in all we had a fun time grilling the pizzas, flipping them with tongs like Bobby Flay. Whether you grill your pizzas outdoor, indoors, or use a pizza stone, these are very versatile recipes and are open to your own interpretations.


Grilled Pizza with Mozzarella and Arugula Salad
Grilled Pizza dough instructions adapted from Bobby Flay
Salad topping adapted from Roberta’s & the New York Times, serves 2
Printable Recipe

1 pound ball of pizza dough, Roberta’s homemade, your own homemade, or store bought, brought to room temperature if refrigerated
Kosher salt and freshly ground black pepper
4 ounces fresh mozzarella cheese, cut or broken into small pieces
4 tablespoons freshly grated Italian Parmigiano-Reggiano cheese
Extra virgin olive oil
Crunchy sea salt (I liked Maldon)
2 handfuls baby arugula
Half a lemon, juiced and seeds removed

Punch and stretch out the pizza dough with your fingers until you reach a desired shape, round or slightly elongated your choice (not all pizzas have to be round.) Heat a gas or charcoal grill to high and in the meantime put the arugula in a large bowl and dress it lightly with a splash of olive oil, lemon juice and a further pinch of salt, or to taste. Brush both sides of the dough with oil and season with salt and pepper. Grill until golden brown on both sides (use long tongs to flip them), about 2 minutes per side. Remove the pizza to a flat surface (we slid ours on a pizza peel dusted with cornmeal) and top with the mozzarella and Parmesan, then slide the pizza back on the grill, cover and heat just long enough for the mozzarella to melt and become bubbly, about a minute. Remove and top with the dressed salad greens and serve immediately.


This will be shared with Foodie Friday at Rattlebridge Farm, Miz Helen’s Country Kitchen Full Plate Thursday, and Food on Friday at Carol's Chatter.  

Have a great weekend everyone.