Wednesday, June 29, 2011

Crunchy Chicken Salad + a tip on how to keep baby lettuce fresh


As much as I love salads, I rarely order them as a main course in a restaurant because frankly, I think I do a better job of making them at home. Also I find that many restaurants use bottled dressings instead of making their own vinaigrette. I have never cared for the taste of bottled dressings no matter whose fancy chef’s name they put on the label.

So when we were in Chattanooga last summer having lunch with Meakin’s son at J. Alexander’s, I spotted a grilled chicken salad on the menu that appealed to me. It said the chicken was tossed with a mixture of baby salad greens, fresh herbs, crunchy cabbage, and topped with crispy tortilla strips. I asked the waitress about the dressing and she said the chef makes his own house balsamic vinaigrette. Sounding better by the minute, I broke my own rule about ordering a salad in a restaurant, then crossed my fingers, and placed my order. After the couple of bites I interrupted their conversation.  “This is fabulous. I would have never thought to add shredded cabbage to a green salad.” You might call this an “ah ha” moment for me in salad making and surprised everyone at the table, including me.

At home I’ve made this salad numerous times with grilled chicken breasts and left-over roasted chicken breasts and both work equally well. What I do have problem with is how to keep organic baby greens fresh in my refrigerator for any length of time. I buy the ones in the clamshell packages and invariably some of the greens get damp and go limp too quickly when stored in the clamshell.


I saw this idea somewhere, but I can’t remember where. It said to repackage the organic greens as soon as you bring them home into two plastic bags and seal the bags with a clip, leaving a lot of air in the bag so the greens can breathe. It works like a charm and I haven’t thrown away any since I started using this idea. If you’ve looked at the price of organic baby greens lately, you’ll appreciate any ideas on how to lengthen their freshness time. If you’ve discovered other methods that work for you, please share it with me. I’m all ears.


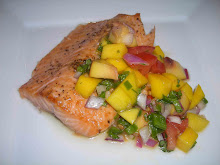
This is a simple, unpretentious salad, certainly not gourmet fare. Instead it’s the kind of meal that’s made for lazy summer days such as the 4th of July when you have more on your mind that slaving in the kitchen. When I think of the 4th of July, coleslaw invariably comes to mind. The shredded cabbage in this brings a lovely crunch as well as an element of surprise to a green salad. If you can find a baby greens mix that includes fresh herbs, all the better, or use assorted fresh herbs from your garden such as parsley and dill. Coleslaw mix works well, but shred your cabbage if you like. I make my own balsamic vinaigrette and for crunch I top the salad with purchased Chow Mein noodles in place of the tortilla strips. You could also make your own homemade tortilla strips as Meakin did here for Mexican soup. An Asian vinaigrette with rice vinegar would also be delicious.


There’s not really a “recipe” for this. For two people I put a good handful or two of organic baby greens with herbs in a large salad bowl along with a big handful of bagged coleslaw mix, chopped roasted chicken breasts, and toss the mixture with a vinaigrette of 1 tablespoon good aged balsamic vinegar mixed with 2 tablespoons extra-virgin olive oil. Season to taste with sea salt and freshly ground black pepper and generously top with Chow Mein noodles. Easily doubled or tripled.

I hope you and your family have a safe and happy 4th of July filled with plenty of good food and sunshine.

One year ago – Firecracker Coleslaw


Wednesday, June 22, 2011

Almond Limoncello Cake – a rich, decadent dessert worthy of a party  


When I was asked to bring a dessert to the blogger get-together party last weekend at Almost Heaven South, there was a time in my life when I would have panicked. Someone once said that the thing most people remember about a meal is the dessert. Desserts have always presented a problem for me because I don’t have a sweet tooth and consequently, I’m not much of a baker. To make up for that, I usually served a fruit & cheese course at dinner parties as the French often do, followed by a demitasse cup of espresso.

Then I fell in love with the idea of healthy fruit desserts and relied on versatile recipes such as this one from Jacques Pepin – Mangos with Dark Rum and Lime Zest. It’s so easy that it could be in a “dessert for dummies” book. Best of all, it looks like sunshine on a plate.


Several years ago good friends visited us in the mountains for a week and one night she asked if she could make dessert. I couldn’t say “yes” fast enough and, before she knew it, we were in the car and off to town to gather the ingredients. This is rich dessert in taste as well as the costly ingredients – Limoncello, an Italian lemon liquor made with vodka, olive oil, and almond paste.


If you want to make your own Limoncello, Giada has an easy recipe on The Food Network website. Mary of One Perfect Bite couldn’t find almond paste at the store the other day and posted a great homemade version, so you can be very resourceful with this recipe.

Now I don’t panic anymore when asked to bring a dessert with a decadent one like Almond Limoncello cake under my belt. I advise making this dessert a day in advance. The cake needs to cool completely before being removed from the springform pan and that takes several hours. Also, if it sits overnight, the Limoncello really sinks in and gives it a richer, more lemony flavor.


Almond Limoncello Cake
Adapted from Barbara Fairchild, Editor of Bon Appétit

¾ cup all purpose flour
1 teaspoon baking powder
½ teaspoon salt
¾ cup sugar
1/3 cup extra light olive oil
5 tablespoons unsalted room temperature butter
1 ½ - 7 ounce tubes (10 ½ ounces total) almond paste, crumbled
2 tablespoons finely grated lemon peel, (2 -3 lemons)
3 large eggs, brought to room temperature
1/3 cup Limoncello (Italian lemon liquor made with vodka)
Powdered sugar
Handful of carefully browned sliced almonds for garnish (optional but pretty)

Preheat the oven to 325 degrees F. In a small bowl, whisk flour, baking powder & salt together and set aside.

In a stand mixer, add ¾ cup sugar, 1/3 cup oil and 5 tablespoons room temperature butter & beat until light & fluffy. Add crumbled almond paste and grated lemon peel. Beat until smooth. Add eggs, one at a time, incorporating well. Add flour mixture and blend.

Butter and flour a 9” springform pan. Transfer the batter to the pan.  Place the springform pan on a sheet pan and place in the oven. Bake until golden brown, about 45 minutes. Remove from the oven and cool cake completely, then remove from springform pan and carefully remove the cake from the bottom of the pan.

Brush top of cake with Limoncello or poke tiny holes in the cake and drizzle with the Limoncello. Can be prepared one day in advance at this point. Cover and store at room temperature. Right before serving, sprinkle with a little more Limoncello and powdered sugar. If desired, garnish with sliced almonds. Serves 8 to 12.


You will have half of a tube of almond paste leftover. It can be kept, well wrapped, in the refrigerator for a month or frozen for three months.

The blogger BBQ party where I took this cake last weekend was hosted by Pitt Masters Larry of Big Dude’s Ramblings and Chris of Nibble Me This on the shores of beautiful Lake Tellico in eastern Tennessee. Larry and Bev sure knew what they were doing when they named their house “Almost Heaven South.” You’ll think you’ve died and gone to heaven relaxing on their comfortable dock while stuffing yourself with authentic Texas BBQ served Lockhart, Texas style on butcher paper. Here’s an example of some of the different varieties of BBQ.

BBQ Lockhart Texas style on butcher paper

Check out Larry’s post for more mouthwatering pictures of the real Texas BBQ they served and his second post about the party. You’ll see why we ate so much we may not need to eat again for a week. After the spread they put on, everybody groaned at the thought of dessert.

I am linking this to Foodie Friday hosted by Designs by Gollum and Stone Gable's Menu Monday.  Please visit Designs by Gollum and Stone Gable to see more wonderful recipes and food related posts.

Friday, June 17, 2011

My Father’s Unfried Chicken Recipe for Father’s Day


I grew up in the south and fried chicken was a family favorite in our home. As I’ve mentioned before, my mother was a great southern style cook, but never taught me how to cook. Actually I wasn’t even allowed to help much at all in the kitchen other than to dry the dishes or grate the cheese for pimento cheese sandwiches. However I loved to stay with her while she baked homemade bread, canned blueberry jelly, or whipped up a batch of fresh mayonnaise. A curious child, I would ask how to do this or that, but the answer was always the same. “Oh, I don’t know. I just do it.”

When I took Home Ec in the tenth grade, one of our assignments was to make dinner for our family. Naturally I chose fried chicken, mash potatoes and gravy, and some kind of vegetable which I don’t recall. All I remember was the chicken. This is rather embarrassing to tell on myself, but my mother cooked the entire dinner and there was never a question in her mind as to whether I was going to cook or not. The answer firmly was “no” and certainly not in her kitchen. As I look back on it today, I don’t know whether she thought I would make a huge mess and splatter grease all over her immaculately clean stove or that she thought she wasn’t a good enough cook to teach me. Probably the latter. I’ve found that a lot of people that cook from scratch using recipes in their head and do not measure don’t think of themselves as good cooks, which would apply to my mother. It certainly wasn’t that she wasn’t smart. She was a tough taskmaster on her students in her seventh grade English class and anyone who finished that class by golly spoke with good grammar and could diagram a sentence.

As my parents got older and my mother’s health declined, my father Bo did more and more of the cooking. One of his specialties was fried chicken, only he didn’t fry it, he baked it and we called it Bo’s "unfried" chicken. He made his own homemade bread crumbs by whirling around torn pieces of bread in what was then “the” new kitchen toy of the time - the food processor. To put his personal touch on the dish, he seasoned the crumbs with a few of his favorite herbs and spices.

One of the best tricks I learned from him was to add big generous dashes of Tabasco sauce to the beaten egg mixture. By the way, you almost can’t add too much hot sauce to the eggs. It gives the chicken a subtle extra kick of flavor, but definitely doesn’t make it hot or spicy.


The only major change I’ve made is to use really good quality extra virgin olive oil, because the flavor of the oil really comes through in this dish. You could also use a whole cut-up chicken or breasts with skin and bones to make a more authentic “southern fried” chicken. In either case, you’ll need to make more crumbs and egg wash, use more oil, and extend the cooking time accordingly.

We’ll be spending Father’s Day at a blogger get-together at Almost Heaven South on Lake Tellico for an authentic Texas BBQ served up by grilling greats Larry and Chris. To all the fathers out there, I hope you have a wonderful day surrounded by family and friends, filled with sunshine, happiness, and all your favorite foods. And be sure to give my father’s “unfried” chicken recipe a try. I know it’s sure to become one of your family favorites too.


Bo’s Unfried Chicken
From My Carolina Kitchen - Serves 4

4 boneless, skinless chicken breast halves, excess fat removed
Kosher salt and freshly ground black pepper to taste
2 cups unseasoned homemade bread crumbs (use a firm country bread)
½ cup all-purpose flour
¼ cup finely chopped fresh Italian flat-leaf parsley
¼ cup finely chopped fresh basil
1 teaspoon dried oregano
2 teaspoons sweet Hungarian paprika
2 large eggs, beaten to blend
Several big generous dashes of hot sauce, such as Tabasco
3 tablespoons (may need more) best quality extra-virgin olive oil

Preheat the oven to 400 degrees F. Flatten the chicken breasts slightly with the heel of your hand, dry well with paper towels, then season with kosher salt and freshly ground black pepper on both sides.

On a large piece of wax paper combine the bread crumbs with the flour, parsley, basil, oregano, and paprika. In a large bowl, whisk the eggs together with several dashes of hot sauce.

One at a time, dip each chicken breast in the egg wash, allowing the excess to drip off. Then coat each side of the chicken with the bread crumb mixture. Place the chicken on a sheet pan and set aside in the refrigerator for about 30 minutes to allow coating to adhere to the chicken.

In a heavy oven-proof nonstick skillet large enough to hold 4 breasts, heat the olive oil over medium-high heat until it is hot. Add chicken pieces and cook until they just begin to brown, about 2 - 3 minutes on each side. Turn carefully with a spatula or tongs. (When I first put the chicken in the hot oil, I gently scoot it around for just a second, no more, so they don’t stick. An unconventional method, but it works. After that, don't touch them again until it's time to turn them.)

After chicken has browned on both sides, you may need to add a bit more olive oil at this point so the chicken doesn’t stick. Place skillet with chicken on the bottom rack in the preheated oven and bake 15 - 20 minutes, or until chicken is golden brown on both sides and its internal temperature reads 160 degrees F on an instant read thermometer. It may take longer to cook, depending on the size and thickness of your chicken.

Remove chicken to a cooling rack and let rest for ten minutes. This is an important step, because if you put the chicken it on a paper towel right away, it will steam and the crust tends to come off.


This chicken tastes great served hot or at room temperature, making it perfect for picnics or family outings.

This recipe was featured on Stone Gable's On the Menu Monday


Thursday, June 9, 2011

Garden Herb Bouquet


Sometime friends will call at the last minute and invite us to their house for dinner. Since we don’t like to go to anyone’s home empty handed, I know as soon as my husband hangs up the phone, he’s going to say, “What can we take?”

We always have a bottle of wine on hand, but it’s nice to take a little something along with the wine. That’s when it pays to be resourceful. Unless it’s the dead of winter, I go outside and see what’s in our garden that I can make into a bouquet.

The above herb bouquet is one I put together last summer when the zinnias were blooming. I just added some fresh rosemary and sage from our herb garden, tied a bow, and voila, we were good to go. The inspiration came from the photo below of an herb bouquet in an old Gourmet magazine.

Photo from Gourmet 
Use what herbs you have growing in your garden and add some flowers or salad greens, such as arugula, perhaps from your refrigerator. When your chives are blooming, be sure to add them.


Here are some flowers that blossom in our mountain garden in the springtime. Some such as the pink peonies would be too large to combine with herbs, but make a splendid flower bouquet on their own. The delicate white Dutch Iris would be pretty addition to any arrangement.


I’ll be linking this to Beverly’s How Sweet the Sound Pink Saturday. Be sure to stop by and be inspired to add some pink into your life.

I'm also linking this to Garden Tuesday hosted by Pam at Sidewalk Shoes. Drop by and see what others are featuring in their gardens this week.

Saturday, June 4, 2011

Sautéed Shrimp with Fresh Navel Oranges – Summer & Winter versions

Summer version

When I saw Sara Foster’s Sautéed Tangerine Shrimp on my friend Penny’s blog, Lake Lure Cottage Kitchen, last winter, I knew at first glance it would be a recipe I would love. Penny told her readers, “The warmed sections of tangerine in this dish are a sweet surprise with the shrimp.” And she was right.

Sara Foster is one of the country’s most well respected experts on simple, honest food, prepared with fresh, local seasonal ingredients. Sara also recommends clementines in this recipe in the winter, which are available in the US from late October through February. Clementines are the tiniest of the mandarin oranges. Imported from Spain, Morocco, and other parts of North Africa, they are a cross between a sweet orange and a Chinese mandarin. I’ll never forget the first time I tasted a clementine. I was in the check-out line at the supermarket and the person in front of me had a crate of the tiny oranges. Never having tasted a clementine, I asked, “Are those good?” He promptly made a slit in the mesh covering the clementine’s and handed one to me. “Try it,” he said. “You’ll always remember this day.” What a generous gesture from a stranger.

When we were in Florida last winter, I made this dish with a combination of local Florida tangerines and winter blood oranges and it was every bit as good as I’d thought it would be. I’ve also made it with Spanish clementines and it was equally divine. The problem was I never got around to posting it. For the recipe of winter version of Sara Foster’s dish, go to Lake Lure Cottage Kitchen. Here’s my photo of the winter sautéed shrimp with tangerines & blood oranges. As you can see, the peeled tangerines give a cleaner, less messy look to the dish than the sectioned Navel oranges, but the taste in both dishes is scrumptious.

Winter version
The other day my husband requested the dish again. Since it’s almost summertime I substituted Navel oranges with great success.  So whether you make this in the summer or winter, you’ll find this dish full of flavor and freshness.

Summer version

Sara Foster’s Sautéed Shrimp with Fresh Navel Oranges – Summertime Version
Adapted from Fresh Every Day, More Great Recipes from Foster’s Market by Sara Foster

Serves: 4 to 6
Level: Easy

Juice of 3 - 4 Navel oranges
2 – 3 Navel oranges, peeled, sectioned, seeds removed
1 tablespoon grated fresh ginger (from a 1-inch piece)
1 clove of garlic, minced
1 ½ pounds large wild caught shrimp, peeled and deveined
1 tablespoon olive oil
1 tablespoon unsalted butter
½ tablespoon chopped fresh rosemary
Kosher salt and freshly ground black pepper
2 tablespoons chopped fresh cilantro

Combine the orange juice and orange sections, ginger, garlic, and peeled shrimp in a bowl and toss to coat the shrimp. Cover and marinate the shrimp in refrigerate for 2 to 3 hours, no longer.

Heat half of the oil and half of the butter in a large non-stick skillet over medium-high heat until the butter melts. Remove the shrimp from the marinate, reserving the marinade. Pat the shrimp dry with paper towels, season with salt and pepper, and place half of the shrimp in the skillet to sauté for 1 to 1 ½ minutes per side, until they turn pink. Place the cooked shrimp on a platter covered loosely with foil to keep warm. Add the remaining butter and oil to the skillet and cook the remaining shrimp.

When all of the shrimp are cooked, pour the marinade and orange sections into the skillet, along with the chopped fresh rosemary. Increase the heat to high and boil the marinade until it has reduced by half, about 30 seconds. Turn off the heat and stir in the cilantro. Season with additional salt and pepper if needed and serve the shrimp warm with the orange sauce and sections spooned over them. Serves 4 to 6.

Cook’s notes: Don’t leave out the cilantro, because it gives the dish a real brightness. Rice with little green English peas makes a lovely base for the shrimp and oranges.

Winter version