Thursday, February 28, 2013

Ina’s Beef Bourguignon and a Man in the Kitchen


Hello to all and I’m so glad to be back. You have no idea how much your get well wishes and lovely comments have meant to me these past several weeks. I’ve missed blogland immensely, especially reading your blogs and visiting with you. My life has been lonely and boring without you. I’m glad to report that my neck pain has improved greatly due to the treatment and physical therapy and isn’t nearly as painful as it was. Gone - no, but much better. However, my back pain continues to be a constant problem that just will not go away. I have to learn to adjust to limitations and some days are better than others. As one of my favorite writers, David Baldacci, said in his book The Camel Club, “Old age always sneaks up on one, but once it’s fully present, the effects are hardly subtle.” 

My dear husband Meakin has been doing more of the cooking lately with me doing the menu planning, prep in the kitchen, and of course my homemade vinaigrettes and salads. Having a good life partner has been the best thing that’s ever happened to me. “We do it together” is our motto. Meakin is a real jewel and I don’t know what I would do without him. And he’s a great cook and taught me a lot of what I know. I will continue to do my weekly postings with Meakin’s help in the kitchen as well as his being MCK’s photographer extraordinaire, so plan on seeing more of the “we” word from now on.

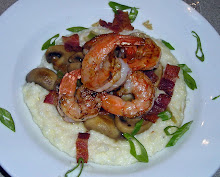
Beef Bourguignon is one of our favorite comfort dishes. I decided to try Ina’s recipe because, first of all you can count on her recipes to work because she does an outstanding job of testing, and second, she served her bourguignon on thick slices of toasted country bread or sourdough and I thought that sounded rustic and appealing.


With regard to testing recipes, Ina’s instructions do a great job of guiding you through the cooking process and help you to avoid glitches that other recipes tend to overlook. Case in point - she reminds you to dry the beef before you sauté it. This is a very important step to keep the meat from splattering when you brown it and often is overlooked by other recipe developers. If you’ve ever been splattered from oil in the pan when you added damp meat, you know exactly what I’m talking about. The other reason to dry the meat, and the most important one, is that if you don’t dry it well, it won’t brown properly and ends up stewing.

We thought serving the bourguignon over toasted country bread was a big success and would definitely do it again. The only thing I will add to that is that it made the dish slightly heavier compared to serving it over the traditional noodles or potatoes. It’s nice to know there is another alternative and one we’ll remember.

A caution regarding the ½ cup of Cognac that is called for in the recipe – that is an awfully lot of Cognac to flame, especially if you’re shy about flambéing (that would be me). Meakin even commented it seemed a bit too much and he's very comfortable flambéing dishes. You’ll see below that I’ve changed it to ¼ cup. (See discussion about why to flambé in the comments section.) You can also lighten up on the amount of bacon if you wish and avoid heavily smoked bacon or it will dominate the dish. Don’t leave out the fresh parsley in the end. Fresh herbs such as parsley give a braise dish a nice blast of freshness in the end. Give this recipe a try – it’s a winner.


Ina’s Beef Bourguignon
Adapted from The Barefoot Contessa via The Food Channel – serves 6
Printable Recipe

1 tablespoon olive oil
¼ pound apple wood smoked bacon, diced
2 1/2 pounds bottom round beef, trimmed of excess fat & cut into 1-inch cubes
Kosher salt & freshly ground black pepper
1 pound carrots, peeled, then sliced diagonally into 1-inch chunks
2 yellow onions, peeled and sliced
2 teaspoons chopped garlic (2 cloves)
1/4 cup Cognac or brandy
1 (750 ml.) bottle good dry red wine such as Cote du Rhone or Pinot Noir
2 cups fat free, low sodium beef broth
1 tablespoon tomato paste
1 teaspoon fresh thyme leaves or 1/2 teaspoon dried
4 tablespoons unsalted butter at room temperature, divided
3 tablespoons all-purpose flour
1 pound frozen whole onions (or fresh small onions, parboiled & browned)
1 pound fresh mushrooms, stems discarded, caps thickly sliced
Country bread or sour dough, toasted or grilled and rubbed with garlic clove
1/2 cup chopped fresh flat leaf parsley

Preheat the oven to 250 degrees F. Heat the olive oil in a large Dutch oven. Add the bacon and cook over medium heat for 10 minutes, stirring occasionally, until the bacon is lightly browned. Remove the bacon with a slotted spoon to a large plate lined with paper towels.

Dry the beef cubes well with paper towels, then sprinkle them with salt and pepper. In batches in single layers, sear the beef in the hot oil for 3 to 5 minutes, turning to brown on all sides. Remove the seared cubes to the plate with the bacon and continue searing until all the beef is browned. Set aside. Toss the carrots and the sliced onions in the fat in the pan, season with salt and freshly ground black pepper, and cook for 10 to 15 minutes, stirring occasionally, until the onions are lightly browned. Add the garlic and cook for 1 minute more. Remove the pan from the heat and add the ¼ cup of cognac. Stand back and ignite with a match to burn off the alcohol. (You can add up to ½ cup of cognac if you wish).

Put the meat and bacon back into the pot with the juices. Add the bottle of red wine plus enough beef broth to almost cover the meat. Add the tomato paste and thyme. Bring to a simmer, cover the pot with a tight-fitting lid and place it in the oven for about 1 1/4 hours or until the meat and vegetables are very tender when pierced with a fork.

Time out for a cook’s note: If you wish to prepare this dish in advance, at this point when it cools you can cover it and keep it covered for several days in the refrigerator. We like to skim off the excess fat from the top with a spoon when it’s removed from the refrigerator and still cold. Braises served the next day are always better for maximum flavor.

Combine 2 tablespoons of butter and the flour with a fork and stir into the stew. Add the small whole frozen onions or if you are using fresh onions, parboil in lightly salted water for 30 seconds, drain and brown in a little oil oil, the add a little salt and add to the stew. Sauté the mushrooms in 2 tablespoons of butter for 10 minutes until lightly browned, lightly sprinkle with salt and pepper and then add to the stew. Bring the stew to a boil on top of the stove, then lower the heat and simmer for 15 minutes. Season to taste.

To serve, toast the bread in the toaster or oven. Rub each slice on one side with a cut clove of garlic. For each serving, spoon some stew over a slice of the toasted bread and sprinkle with chopped fresh parsley.

Cook's notes: The French would not use overly smoked bacon in their Bourguignon. Therefore I suggest that you use a lightly apple wood smoked bacon and stay away from the heavily smoked bacons such as Nueske’s and Benton’s. Both brands are excellent smoked bacons, but save them for a BLT or breakfast. You don’t want your Bourguignon to taste too smoky.


I will be sharing this with Foodie Friday at Rattlebridge Farms, Miz Helen’s Country Kitchen Full Plate Thursday, Foodie Friday at Simple Recipes, Foodtastic Friday at Not Your Ordinary Recipes, Weekend Kitchen Creations, Seasonal Sunday at the Tablescaper, The Clever Chicken Chick, and On the Menu Monday at Stone Gable.

Have a great weekend everyone. It’s great to be back.


Tuesday, February 5, 2013

Checking In


Hi everyone. I’m just checking in, midway through my therapy, to say hello and also to say how much I miss visiting with you and reading your blogs. On my last post I touched on that I’m suffering from neck pain right now that stems from my chronic back pain and my time allotted at the computer has been drastically reduced. I’m seeing a physical therapist who has put me on a restricted schedule of what I can and cannot do right now. A great big thanks to those of you who have stayed in touch and asked about my progress. Right now I’m about half way through and my therapist feels that I am progressing nicely. The best news is that I’m feeling much better. So my life should be back to normal in a couple of weeks.

Part of my prescription is to take it easy and what better place to take at easy than at the beach. Last week Meakin took me to the Yucatan Beach Stand for lunch where we devoured a couple of their spicy Yucatan Sunfish fish tacos, filled with grilled fish, crunchy cabbage, tomatoes, and cilantro with a dash of ranch dressing - a house specialty. Then we enjoyed a leisurely stroll along Fort Myers Beach.

Photo source

Life is good - we are enjoying retirement and a mild winter. The only kind of white stuff I ever want to see in the winter is powdery white beach sand. Have a great week everyone and I hope to be back to blogging in a couple of weeks.

Thursday, January 17, 2013

Jacques Pepin’s Pork Sausage Rolls with Potatoes, Onions & Tomatoes


One of the joys of having a recorder is to be able to record our favorite television series and watch them at our convenience. Jacques Pepin’s Essential Pepin is one of our favorites. The other night we watched him make a sausage dish and remembered fondly that Stuart, my brother-in-law, had made the very same dish recently and shared one of the sausage rolls with us. If it's possible, Stuart loves Jacques Pepin even more than we do.

Today I’m going to share some of the photos we took of the sausage rolls Stuart made instead of preparing the rolls myself because for the next several weeks I’m seeing a physical therapist who has put me on a very restricted schedule of what I can and cannot do right now in addition to therapy sessions that will last for possibly as long as a month. Neck pain has recently cropped up that stems from my chronic back pain and primarily I’m not too happy about it because I won’t be able to be out-and-about visiting your blogs as much as I would like. Pardon the pun, but it's a "pain in the neck" to have to be aware of how I'm holding my head all of the time. Of course my time allotted at the computer has also been drastically restricted and that of course will also affect the regularity of my posts. So if you don’t hear from me as much as usual for a while, you’ll know the reason and please don't forget me.


Jacques’ recipe is available on-line at his website Essential Pepin here and also in his book by the same name. This is an interesting recipe because instead of using casings to make the pork sausage, its wrapped in plastic wrap to create a log, then cured in the refrigerator for 2 days. In the cookbook he browned the sausage logs on top of the stove with onions and potatoes, which is how we cooked it. Meakin threw in some halves of cherry tomatoes for color as you can see in the photos. On the television series, Jacques showed an alternate method of cooking them which was to cook them in about 2 inches of water at 150 degrees on top of stove for one and 1/2 hours. Either way works very well.


The recipe called for black trumpet mushrooms, which Jacques finds in the woods around his house. If you don’t happen to have trumpet mushrooms in your woods, he suggests that you substitute dried porcini mushrooms, which are easier to find. When Stuart made his sausage rolls, he adapted the recipe by using a mixture of sliced shiitake, wood ear, porcini and oyster mushrooms and instead of pistachios, he substituted pine nuts. He also added a tablespoon of Italian seasonings.

This recipe makes two impressive sausage rolls that happen to also be very easy if you have the time to cure the sausage for 48 hours. When we prepared the dish, Meakin added the tomatoes to the potato and onion mixture when he cooked the sausages for fun as well as color and we served it with fresh spinach.

Thank you Stuart for helping me out and sharing Jacques fabulous sausage rolls you made for us.


This will be shared with Foodie Friday at Rattlebridge Farms, Miz Helen’s Country Kitchen Full Plate Thursday, Foodie Friday at Simple Recipes, Foodtastic Friday at Not Your Ordinary Recipes, Seasonal Sunday at the Tablescaper, and On the Menu Monday at Stone Gable.

Have a great weekend everyone. I hope to be back in full swing soon.

Thursday, January 10, 2013

Split Pea Soup Flavored with Ham and Rosemary + secrets to making a great soup


For some people, soup is reserved for fall and winter. Not us. We eat soup year-around and enjoy it no matter what the weather or the season. It’s been rather warm this week and a couple of days the high was in the low eighties. You would think it was April rather than January. This guy was sitting on the top of our car yesterday in Naples and sends his greeting from the Gulf coast of southwest Florida. Someone joked that maybe he was tired and wanted a catch a ride.


One of our all time favorite soups, and one of the easiest to make, is split pea soup. In fact I posted it a couple of years ago, link here. But today my split pea soup is a little different because I have a left-over ham bone from a baked ham that I want to use. Basically you just add the ham bone to the liquid of the split pea soup while it cooks. However, the ham bone will add more fat to the soup than I want, so I plan to skim to fat from the top of the soup. To do that I’m going to let the soup sit overnight in the refrigerator after it’s cooled from cooking and skim the fat from the top the next day. For a vegetarian soup, leave out the ham entirely and substitute vegetable broth for the beef broth called for in the list of ingredients.

Before we get to the recipe, I want to share a couple of secrets to making a rich and flavorful soup. The first is sautéing the vegetables until they lightly browned. My mother used to throw the vegetables in without browning them first. While there’s nothing wrong with that, and it does save some time, if you brown the vegetables first your soup will have a much richer flavor. Here’s what I do. I start sautéing the vegetables on high heat, then quickly switch to low, season with salt and pepper, and cook them slowly until they are nice and brown, taking care that they not burn.

The second secret is to add the herbs and a little bit of tomato paste to the vegetables at the end of the browning stage to let them flavor the vegetables at that stage. The tomato paste brings an incredible amount of flavor to the mixture and it’s nice for the herbs to sauté a minute or two to incorporate them with the vegetables.


Split Pea Soup Flavored with Ham and Rosemary
From My Carolina Kitchen and inspired from Cooking Light – serves 4 

12-oz package of green split peas
6 cups liquid (I use 4 cups of low sodium, low fat beef broth & 2 cups of water)
1 bay leaf
1 ham bone, trimmed of excess fat
1 tablespoon extra-virgin olive oil
1 onion, finely chopped
2 whole carrots, scraped & diced
2 small cloves of garlic, finely chopped
1 teaspoon dried thyme
2 teaspoons fresh rosemary, chopped
Kosher salt and freshly ground black pepper
1 teaspoon sweet Hungarian paprika
1 tablespoon tomato paste
1 tablespoon low-sodium soy sauce

Seasonings added before serving:
1 teaspoon extra-virgin olive oil
2 teaspoons chopped fresh rosemary
4 tablespoons chopped fresh flat-leaf parsley

Sour cream for garnish

Combine the peas, liquid, and ham bone in a large stockpot, cover, bring to a boil. When the mixture boils, turn to low and cook for 45 minutes to an hour, checking at 45 minutes for doneness.

In the meantime add the olive oil to a nonstick skillet over high heat. Start the vegetables off on high and quickly turn heat to very low, stirring very frequently. Sauté the vegetables until they are well softened and have taken on a slightly golden hue. Add thyme, rosemary, salt, pepper, and garlic and stir to cook for a moment. Add tomato paste, stir well, and cook a couple of minutes more to incorporate the tomato paste. Add soy sauce & cook until the liquid evaporates.

Add vegetables to the peas along with the bay leaf.  Peas should be done in about 45 minutes to an hour. Remove and discard bay leaf and the ham bone. Taste and season the soup with salt and pepper and add more liquid if necessary. Cover the soup and when it is cool, transfer to the refrigerator overnight.

The next day remove the layer of fat that has formed over the soup overnight and discard. At this point heat the soup up, then puree it with a  wand mixer (or use a blender) or puree half and leave the remaining half of the soup chunky. Serve right away, or cool and store in the refrigerator, covered, for 2 to 3 days.

Before serving soup, combine the last minute seasonings in a small bowl and stir into the soup. Spoon soup into serving bowls and top with about a tablespoon or so of sour cream.


Or not.


This will be shared with Foodie Friday at Rattlebridge Farms, Miz Helen’s Country Kitchen Full Plate Thursday, Foodie Friday at Simple Recipes, Foodtastic Friday at Not Your Ordinary Recipes, Seasonal Sunday at the Tablescaper, The Chicken Chick, and On the Menu Monday at Stone Gable.


Have a great weekend everyone.

Thursday, January 3, 2013

Quick Ham and Cheese Biscuits – a low fat version of fast food breakfast


These ham and cheese biscuits are perfect for days when you are in a hurry and don’t have time to make a sit-down breakfast. You could call them homemade fast food. They are a great “on the go” portable breakfast that can be held in one hand.

Kids as well as husbands love these ham and cheese biscuits. They’re perfect to eat in the car on the way to school or work. Or take a bag with you on an early morning fishing trip, which is where this boat looks like it’s headed as he motored past our lanai last week.


To make these biscuits light, the shortening (or butter in many recipes) was left out and the amount of low-fat milk was increased for moistness. Because the biscuits contain no shortening, they are lower in fat and calories than fast food joint biscuits. However, for that same reason, they don’t keep as well, so wrap them carefully if you are not going to eat them right away. I find that if you use extra-sharp Cheddar cheese, the biscuits will have more cheese flavor.

The biscuits come together in a matter of minutes. After mixing, simply drop them onto a baking pan (no rolling or cutting necessary), stick them in the oven, and in less than 25 minutes breakfast is ready. It is also a great way to use left-over ham.


Quick Ham and Cheese Biscuits – a low fat version of fast food breakfast
Adapted from Cooking Light – yield 1 dozen

Cooking spray
1 ½ cups chopped ham, about ½ pound, low fat preferable
2 cups all-purpose flour
1 cup (4 ounces) shredded extra-sharp Cheddar cheese
2 teaspoons baking powder
Dash or two of ground red pepper (cayenne), optional
1 cup 1% low-fat milk

Preheat the oven to 400 degrees F. Coat a 10” nonstick skillet with cooking spray and place over medium heat until hot. Add ham and sauté until lightly browned, about 3 - 4 minutes. Combine the ham, flour, cheese, baking powder, and red pepper in bowl. Add the milk, stirring just until dry ingredients are moistened.

Drop biscuit batter by heaping tablespoons onto a baking sheet coated with cooking spray. Bake in a preheated 400 degree F oven for 22 minutes. Yield 12 biscuits.


This will be shared with Foodie Friday at Rattlebridge Farms, Miz Helen’s Country Kitchen Full Plate Thursday, Foodie Friday at Simple Recipes, Foodtastic Friday at Not Your Ordinary Recipes, Seasonal Sunday at the Tablescaper, Chicken Chick, Carol's Chatter Food on Friday, and On the Menu Monday at Stone Gable.

Have a great weekend everyone.